Any fight has its own rules, without knowing which you can easily gain a ton. Hopefully, a few tips will improve your chances of emerging from a sporting or street hand-to-hand fight as unscathed as possible.
Rule 1. “Be water, my friend” - Bruce Lee
The famous master did not give useless advice. Be water. Like her, who takes any form, adapt to the enemy. Study his behavior, but in no way play by his rules. All this skill comes with experience, however, there are also patterned types of behavior against which effective techniques have been invented:
- If your opponent in hand-to-hand combat takes a defensive stance and behaves passively (he is confident of victory and thinks that he is ready for anything), strike directly at the defense. No, it will cause almost no damage, but your opponent may become confused. Then don’t miss the opportunity to carry out an effective attack.
- The opponent is aggressive - work with counterattacks. Avoiding the blow and immediately retaliating.
- If the enemy himself works with counterattacks, deceive him, make a false blow, dodge his response, and immediately hit him again.
Rule 2. Hit to the head-body!
About the good old connection " head-body“fighters often forget during a duel, but this can quickly end the outcome of the fight not in their favor if the enemy uses such a technique. The essence of the pin is that it forces the opponent to shift his defense. A blow to the head - the guard moves higher, opening the body a little. After a couple of combinations, however, it is better to change the direction of the blows to “body-to-head” or switch to other techniques in order to prevent the enemy from getting used to your behavior in hand-to-hand combat.
Rule 3: Stay on your feet
Keep your feet off the ground during attacks. Firstly, this will cause your strikes to lose power, and secondly, the enemy will take advantage of your unstable position. His retaliatory attack can knock you down.
Rule 4. Save energy
This rule can be taken to the first position: due to its neglect, there were too many cases of knockout when the opponent simply “turned off” a tired fighter. Do the opposite. Stay calm, don't rush at your opponent, don't make unnecessary movements. Patience.
Rule 5: Don't hold your breath
This is also a typical mistake. Breathe evenly, as if you were jumping rope or doing other exercises. In a fight, especially a street one, this will help you stay calm.
Rule 6: Keep your eyes on your opponent
“I don’t see = they don’t see me.” Forget it. In battle, the enemy sees you perfectly, and if you take your eyes off him, he will not change his mind about hitting, but will only become even more inspired. Don't you think it's better to see where you got to and what the enemy did in response? The most effective missed shots are the ones you can't see.
Rule 7. A direct blow kills everything!
70% of blows in any hand-to-hand combat should be direct blow, or jab . Change the way you hit:
- Hard or hard
- Double and triple
- Softly, for distraction
- Quickly from half-outstretched arm
The jab is good in almost any situation. When you control the battle, when you need to keep your opponent at a distance, or even just if you don’t know how to work against your opponent: in this case jab- this is something like reconnaissance in force.
Rule 8. Turn the tide of the fight
Don't let your opponent complete the chain of blows: disrupt his plans by hitting him in the cut. With your other hand, protect your head and body. Do not sit back on defense under any circumstances: there will still be missed shots.
Rule 9. Never leave your opponent unpunished
No matter how the hand-to-hand combat proceeds, the enemy does not have the right to carry out a series of blows, retreat, and then begin an attack again. He has no right to give up. Crossing your legs and lifting them off the ground during attacks is the same. He must not close his eyes and lose sight of you. He is forbidden to make mistakes at all, otherwise he will receive punishment in the form of missed blows from you.
Not every one of us can boast of free time to attend training outside the home. Therefore, an article about how to understand martial arts and master them at home should benefit many, since no one is safe from ill-wishers who may suddenly attack you in a dark alley or in the entrance of your high-rise building.
Hand-to-hand combat techniques
 The most popular and simplest, in terms of technique, is hand-to-hand combat. In order to master self-defense techniques, you do not need a 180-degree split or any other superpowers.
For beginners, it is enough to have fists that are ready at any moment to repel the attacks of an attacker. Traditional in everyday life is a direct blow.
Punching your opponent in the nose, jaw or eye will help you gain an advantage in a surprise fight and will give you enough time to escape from the enemy's sight.
If you have never fought before, these types of blows can seriously injure your hand. Therefore, it is more correct to hit with an open palm. This way, you have a greater chance of causing serious injury to your ill-wisher rather than to yourself.
Another popular technique is the uppercut - an upward punch to the opponent's jaw. Its advantage is that it is much more powerful than a direct blow and is capable of knocking out an enemy.
Kickboxing techniques
 For those who already have sufficient fists, but believe that this is not enough to knock out an enemy when left alone with him, kickboxing comes to the rescue - boxing in which kicks are used.
His technique is quite diverse, and in order to master the desired techniques, it is better to turn to video tutorials, which are sufficiently available on YouTube.com.
This type of martial arts is also suitable for girls. If you don't even plan to learn how to fight, kickboxing can be just a good way to lose excess weight. As they say, two birds with one stone.
Karate techniques
 The most complex and professional style is karate. It will take more than one day or even a week to learn its techniques.
If you decide to become Bruce Lee at home, mentally prepare for daily and intensive training.
This type of martial arts is similar to kickboxing and emphasizes life-threatening kicks.
The stages of learning occur from the bottom up in the truest sense. First, hone your skills while sitting on the floor, striking back and forth with the ball of your toes and the edge of your foot. Below is an illustration of the fundamental techniques.
- kick to the side - eko-geri;
- back kick - ushiro-geri;
- hitting with the forearm from the inside out - uchi-uke.
What techniques should girls use?
All of the above styles that can be used in a street fight are not always suitable for girls.
Therefore, let us turn to what is considered prohibited in professional practice, but is so necessary to protect yourself in the alley.
Knee strike to the groin
 There is perhaps no more effective or simpler way to deprive an attacker of an advantage.
You can also hit with your knee if you are standing too close to each other and with your feet if there is a distance between you.
This method of mutilation is suitable when a situation arises in which the enemy grabs the neck and presses it against the wall. If your hands are locked with your opponent’s, then with a sharp movement you can pull him towards you, while simultaneously striking him in the groin.
Eye gouging with fingers
Suitable if you are being strangled and your hands are free to strike back at your enemy. Use your strongest fingers on both hands – your thumbs. Wrap your palms around the enemy's head and start squeezing the eyes with all your might.
A sharp blow to the solar plexus
 You can hit with either a fist or an open palm. By using this technique, you can buy yourself extra time to get away from the attacker, as the consequence is severe pain and difficulty breathing.
All of the above methods of struggle are permissible only when you are in real danger. They should not be used in school or for outdoor display.
Also, there is no need to behave like a special forces soldier and try to finish off your opponent. At the first opportunity, leave the scene of the accident as quickly as possible and go to safer and more crowded areas.
Danger can lie in wait for us anywhere: both in the evening in the dark in an unlit gateway, and on a busy street if a group of hooligans takes a fancy to your wallet or handbag. If a person knows self-defense techniques, then criminals will have little chance of getting rich at his expense. Therefore, many - both martial arts fans and non-athletes - are not averse to learning hand-to-hand combat techniques. During the training process, students not only master technique and prepare physically, but also undergo psychological preparation for battle. Those who have studied strikes and mastered hand-to-hand combat techniques are calmer and more self-possessed; they develop the composure necessary to successfully complete the battle.


Advantages of hand-to-hand combat:
- no additional equipment is needed for combat: only your body is involved in the battle;
- 24/7 training: you can go into battle in any situation, at any time;
- minimal probability of falling under the articles of the Criminal Code of the Russian Federation: in hand-to-hand combat, the task is to knock out an opponent, throw him off balance, without causing serious harm to health;
- you can strike from any position: there are several pressure points, so you can choose one of them, being on any side relative to your opponent (it is possible to deliver effective strikes in self-defense even while lying down);
- development of strike speed: as a rule, if a person has completed self-defense courses in hand-to-hand combat, and the opponent does not manage to cause pain or serious damage to his health during a fight, you will learn to fight ahead.
Basic hand-to-hand combat techniques
In self-defense, movements should not be chaotic, and there should not be many combat strikes. It is enough to use one hand-to-hand combat technique to neutralize the enemy. Among the most painful places are the nose, eyes, groin area, ribs, lower leg and Adam's apple. Also sometimes blows are delivered to the solar plexus - with this technique you can knock out an opponent by disrupting his breathing.
Basic techniques presented in the pictures:
- Punching in the groin. It is worth considering that such a technique not only brings pain - it can kill a person. Therefore, it is necessary to work out the force of the blow with the hand and foot, so that within the framework of self-defense you do not exceed the permissible limits.
- Reception of breathing failure. This can be done with one effective blow, hitting the solar plexus. It must be applied from the front, and it must be spot-on.
- Simple hand-to-hand techniques: for example, a sharp pat on the ears. It is worth learning this effective technique, as it can keep your opponent off balance for a long time. But this technique has one drawback: you can permanently deprive a person of hearing if the eardrums burst;
- Self-defense techniques that include sweeping. Joints are one of the most vulnerable and painful places; you can break your leg with one of the techniques. Usually, techniques are practiced during short-distance fights, when it is possible not only to deprive the enemy of his balance, but also to help him fall safely.


Training in hand-to-hand combat techniques at the UNIBOS school
As part of the training, all basic techniques are studied. You will learn techniques and prepare both physically and emotionally. After a hand-to-hand combat course, you will be able to use techniques in any dangerous situation, saving yourself or others. In Moscow we provide training for both beginners and professionals. We have our own gym, a staff of qualified trainers (Moscow) - contact the International UNIBOS Federation if you care about your safety.
In this article we will tell you how to learn to fight, since in modern conditions such a skill is useful not only for a man, but also for a fragile girl, which may find itself in a difficult situation.
Each of us at least once in our lives has had to deal with attacks of open aggression from another person. Even if you are a non-conflict person, remember that anyone can become a victim of inappropriate behavior of others. Very often, teenagers find themselves in such situations who, in the opinion of the attacker, are not able to defend themselves on their own. In this regard, every boy, perhaps, wondered: “How to learn to fight?”
Of course, for this you should have the appropriate physical preparation and psychological attitude. We are not saying that you need to get into a fight in response to any remark from the offender. Vice versa, strength of character manifests itself in cases where you can resolve the conflict peacefully and not start a fight at all. However, it is still better to be able to protect yourself and your loved ones in any situation.
Before you master the necessary techniques, realize that it is simply impossible to learn to fight in one day, tune in regular workouts and periodic physical activity, be prepared for possible bruises and abrasions.
The main assistants in mastering self-defense skills are endurance, strength and reaction speed. After all, learning to fight is half the battle; it is also important to avoid blows correctly and quickly. To master this skill you will need a potential opponent, so it is best to turn to a professional in this case. In the hall you will be taught not only how to fight like a ninja or like a special forces force, but will also be told in detail what pain points are present on the enemy’s body, what methods of psychological influence are the most effective, etc. Agree, having such an advantage, you will be able to fight much better and hit your opponent much faster, while avoiding serious consequences, both for yourself and for him.
It happens that there is simply no opportunity to work with a trainer. However, don't despair, You can learn to fight on your own. We will talk about basic skills in this subsection, and also demonstrate several visual exercises.
Agree, any of us can meet a person on the street who, to put it mildly, will be unfriendly. Before you start training at home, watch some video tutorials given below.
And most importantly, remember that the willingness to respond blow to blow should be your main assistant.
What can save you is not technique, not style, or even excellent knowledge of wrestling, but control of yourself and your body. Even if you have not yet mastered any technique, remember the basic street fighting techniques and use them when necessary.
- Knee your opponent in the groin.
- Point the phalanges of your fingers directly at your opponent's eyes and press hard.
- Hit your Adam's apple with your fist.
- Use available tools: keys, phone, lighter.
Yes, someone will call it " dirty tricks“, but sometimes in a street fight the main thing is to survive or get as few injuries as possible, and sometimes there may be several attackers, so these techniques can be extremely effective.
If it is still difficult for you to learn how to learn to fight at home, then it is better to go to the gym with one of the trainers in some direction close to you.
How not to be afraid to fight?
Sometimes we face a psychological barrier because not everyone is ready to hurt another person. Some are afraid of miscalculating the blow and causing serious injury. The important thing here is not to be afraid, but to start serious work on yourself, to prepare yourself for possible difficulties.
Before you say to yourself: “I’m weak, I don’t know how to fight,” think about whether you could calmly watch if someone was molesting your girl, and start training right now. Of course, during sparring you will have to face unpleasant sensations. No manual will tell you how to learn to fight if you are not psychologically prepared for it. Don't try to avoid pain, don't be afraid of it, only then can you get rid of fear.
1. To develop the leg muscles, the so-called duck step is used - a half-squat movement, as well as squats, running and jumping.
Multiple repetitions of what you have learned (strikes, their series, techniques) will allow you not only to master and bring to automaticity the technique of movements, but will also make you more resilient. Trail running and loaded running are recommended.
Jumps are different, and each type develops certain muscle groups.
There are standing long jumps, jumps with an alternating lunge of the right and left foot forward, frog jumps, jumping rope, jumping with a load. Squats are also different: simple squats, barbell squats, squats with calf raises and torso rotations. All these exercises develop the muscles of the legs and pelvis.
2. Exercises for the lower back and abdominal muscles.
To develop these parts of the body, they practice pull-ups, push-ups, lifting the legs and body in a lying position, bending over with a load, “corner” and pulling the legs to the stomach while hanging. All these exercises well develop various muscle groups of the lower back and torso.
3. Exercises for arm muscles. They include push-ups, handstands, barbell work, pull-ups, shot put, and various types of jerks with a load. Such exercises develop the muscles of the arms and shoulders well and strengthen the joints.
Exercises to increase punching power
Practice kicking and punching a sandbag, laminated paper, a log suspended from a beam with rope, or pushing a post with your shoulder. Practice taking hits and how to fall.
These exercises strengthen the muscles, increase the speed of movements and their strength. By training in this way, you will learn to take a punch better and become more confident in yourself and your abilities.
Exercises to develop hitting speed
Without coordination of movements, high speed of attacks and evasions, it is difficult to achieve success in the art of martial arts, so we offer you a number of exercises that will help you go through this difficult path.
In combat, not only the strength of the blow is valued, but also the speed of its delivery. Thus, speed always defeats slowness, and agility dominates over stiffness.
Speed of reception. To increase the speed of performing techniques and strikes, the following exercises are recommended:
– breaking down the technique into simple components and repeating them many times;
– performing a given number of movements in a certain period of time;
– repeating the movement at high speed with additional load (if this is, for example, a direct blow, take a small dumbbell in your hand);
– drawing up a combination of simple movements (strikes) and practicing the speed and quality of its execution;
– work with equipment: kicking and punching a punching bag, a sandbag, a log with a rope wrap. Gradually move from using a soft projectile to a harder one;
– working with a partner in sparring: the partner attacks, you defend. Then you should switch roles.
Speed reaction. In this case, we will talk about the ability to predict the enemy’s movement and change position in a short period of time. To develop this ability, it is recommended to perform the following exercises:
– action on sound or visual commands. Having caught a certain word or gesture of your partner, quickly carry out a defensive technique and counterattack against an imaginary opponent;
– work in sparring: your partner attacks with a combination of blows, constantly changing their strength and direction, and you practice escapes, dodges and other defensive techniques, trying to predict the opponent’s actions;
– training on sandbags. Hang several sandbags from the ceiling and make them swing: these are your imaginary opponents. You, moving between them, practice defense and attack techniques. The effectiveness of this exercise is that you will be able to feel the full weight of the bag on yourself after each blow you miss.
Hand-to-hand combat in Russian style
It has long been customary to compare Russian people with bears. According to many foreigners, the image of the owner of the taiga most successfully reflected both the external and internal qualities of a resident of Ancient Rus'. It was this image that formed the basis of the methods of Russian martial arts.
“Before you learn to walk, learn to stand.”
(Proverb)
Let's start with a small digression: turn on your imagination and imagine that you are standing on the ice in winter in a thick fur coat, hat and felt boots. The pose you take under such conditions is the main stance. In this case, the main thing is to increase the support area as much as possible. Trying to take any other, more beautiful or exotic stances, you will inevitably lose your balance.
To better understand the essence of the basic stance, try to draw a bear. You should slouch (your shoulders will inevitably lean forward), tilt your head slightly (your chin will tuck toward your chest), spread your arms out to the sides, and squat slightly. Now you can feel how all the strength and energy are concentrated in the center of your body. If his position has become stable, then you have done everything right.
Rice. 1. Racks: top frame and bottom frame
Pay attention to children actively sorting things out with each other: in fights among themselves, they usually pull their heads into their shoulders and push with their shoulders and elbows. Their consciousness is not yet burdened with the stereotypes of special fighting techniques that adults use, so children, as a rule, act only instinctively. And this is most natural for a stance with hands down: in the Russian style it is called a stance in the lower frame.
Now imagine how a person protects his head by wrapping his arms around it in case of an unexpected blow. At such a moment, he instinctively feels what exactly needs to be done and what body position to take. However, the art of defending yourself and taking correct stances can be learned over time by practicing one or another type of martial art (karate, boxing, etc.).
In karate, the frame-up stance is called “shizen tan” - “flowing water position”; among fans of Slavic-Goritsky wrestling it is called “heel” or “key joint”.
So, let's look at the main stance of the Russian style (Fig. 1). The knees and fingers are slightly bent, the arms are relaxed, the elbows seem to be turned out and looking outward, while the palms are turned back. Legs shoulder-width apart, feet parallel to each other. However, you should not press your toes too hard into the ground, as this will negatively affect the mobility of your foot and lower leg. The stance must first of all be natural.
Imagine that your toes, elbows, knees, shoulders and the backs of your hands are touching a soft rug hanging on the wall. Some parts of the body only lightly, almost imperceptibly touch the long pile, while others are pressed against the carpet so much that your skin begins to feel the surface of the wall. But, despite small differences in spatial position, they are all in the same plane. The chin touches the chest, the stomach is pulled in, but not tense, the pelvis moves forward slightly. This stance is referred to as frame down, or bottom frame. The frame itself is formed here by the forearms. Your big toes, knees, elbows, backs of your hands and shoulders should touch the imaginary wall.
From such a rack it is easy to move to the upper frame, that is, a rack with the frame facing up. To transition, bend your elbows and raise your palms facing each other so that your thumbs are at eye level. Now, if you lower your arms down a little, your forearms form a frame. This position is natural in battle when you are tired.
Also, as an example, I would like to give one of the most natural, and therefore universal, stands.
Speaking about versatility, it should be borne in mind that this element is often found in various types of martial arts and, what I would like to especially note, makes it possible to both defend and attack.
Stance: one leg (it is not so important whether the left or right, since the stances can be versatile) bent at the knee and set back; the hip of the backward leg is positioned vertically above the heel, and the forward knee is positioned vertically above the big toe. This leg is a load-bearing leg; it supports about two-thirds of the total body weight. The other leg is slightly bent and extended forward, its muscles relaxed. It holds the remaining third of the body's weight and, if necessary, performs an attacking function. Shoulders back, body straight.
“We were initially doomed to defeat, thinking that he (the enemy) was weaker because he was sleeping...”
(From the assassin's report)
But, as in any other science, many mistakes happen when performing a stance. The most common ones should be cited:
1. The toes of the weight-bearing leg are directed backward, as a result of which difficulties in movement are noted.
2. Incorrect distribution of body weight when transferring it to the legs. As a result, the supporting leg quickly gets tired, and the second leg cannot quickly carry out an attack or defense.
3. Incorrect positioning of the foot of the supporting leg, which leads to an unstable body position and loss of balance.
Stands for every day
This section will focus on the ability to be prepared for unexpected attacks. It should be noted that the word “unexpected” is not entirely appropriate here; the point is that you should be ready to defend yourself at any moment. Of course, you shouldn’t get into a fighting stance and swing your fists every time you are asked for a cigarette or asked for the time, and even in a situation where you are openly threatened, a confrontation can be avoided.
Below we present two stances that do not outwardly indicate your readiness for battle. First: place your feet shoulder-width apart so that your feet are parallel to each other and your toes are slightly apart. In this case, distribute the weight of the body evenly on both legs. Keep your arms relaxed along the body, your hands can be clenched into fists. Options are possible when one leg protrudes slightly forward. From this position you can easily move into any other stance, such as the defensive one described above.
Second: the arms are also extended along the body, the back is straight, the toes are spread at an angle of 45°. This stance is wait-and-see and allows you to quickly move to other positions. A number of errors that occur when taking stances:
1. Strong tension and, as a result, loss of concentration and speed of movement, the possibility of the enemy detecting your readiness for battle.
2. Complete relaxation and, as a result, loss of vigilance and the ability to act quickly in the event of a sudden attack.
3. Lack of concentration, improper weight distribution, which leads to loss of balance and alertness.
Rack Requirements
In fact, these requirements constitute a description of the classic (right-handed) stance in Russian hand-to-hand combat:
– you should be able to protect your stomach, chest, neck and head with your right hand;
– protect the middle part of the body with your right forearm;
– protect the right side of the body with your right elbow;
– the center of gravity of the body should be shifted to the right leg so that you can move your left leg freely without the risk of losing balance;
– the head must be mobile so that you can dodge blows;
– raise your left shoulder, lowering your chin, this will allow you to protect the left side of your face and lower jaw;
– the central and left parts of the body are protected by the left elbow;
– a slightly raised left knee should protect the groin;
– the left leg is involved in attack and defense;
– the stance should ensure a change of position without losing balance.
The most important thing in Russian style hand-to-hand wrestling is the naturalness of movements. Why go against nature and fight your innate instincts? Be who you are, be yourself.
Movement technique
Each fighting style has its own classification of movement techniques. Below is the classification for the Russian style.
Classification of movements:
1. Walking (including shuttle, etc.).
3. Jumping.
4. Somersault.
5. Crawling (on the back, stomach, sideways, rolling).
At the first stages of training, it is very important to learn simple principles, without which, unfortunately, it is impossible to achieve anything.
When walking or running, the main quality of movement is its naturalness. The movement of the leg comes from the hip, legs are slightly bent at the knees, hands are relaxed, exhale with each step. You walk slowly and calmly. Breathing is calm and measured, there is no need to think about when to inhale and when to exhale: this process should take place automatically, without your direct participation.
Movement in stances is just as natural and smooth (of course, in the early stages of training, the process of movement will need to be controlled). Leg movements do not play an important role, so you should not focus on them. The main impulse is created by the movements of the pelvis.
Proper breathing is an important element of training. During inhalation, the blood is enriched with oxygen, which allows a person to move actively. If you breathe incorrectly during training, serious health problems can arise.
The popularity of this system is due to its simplicity. There are no specific movements that need to be memorized - the Russian style system does not allow for enslavement and constraint. The steps are similar to the walking of a drunk or very tired person who can hardly move his legs (for a better understanding of this technique, we advise you to refer to the literature describing the “pendulum” system and the Veles wrestling technique).
There are three types of breathing:
1. Average - the usual type of breathing in a normal state of the body. It is constantly observed in everyday life.
2. High, or full - this is how a person breathes when experiencing heavy stress, as well as when ventilating the lungs, when they are quickly enriched with oxygen.
3. Low - this type of breathing is observed when the body loses an excess of oxygen and is saturated with carbon dioxide, when a person is completely relaxed or asleep.
An ancient wisdom says: “Before you learn to fly, learn to fall.” The ability to fall without taking damage is very useful in everyday life and extremely necessary in battle. In many cases, only the ability to roll when falling will help turn the enemy's blow against him.
When running, you need to use the so-called dog breathing, that is, lower level breathing. When you start to feel tired, take a few deep breaths. This type of breathing should become a normal, constant phenomenon in life: when lifting weights, you should exhale, when squatting, exhale, and after taking a blow, also exhale. Please note that this book contains only basic exercises and techniques.
Techniques of falls, somersaults and rolls
All falls during wrestling can be classified according to the purpose for which they are committed.
Classification of falls by purpose:

Rice. 2. Falling off the stand
1. Falling as a way to soften the impact on the ground.
2. Falling and rolling as ways to move the body.
3. Falling as a way to avoid a blow, grab, or throw.

Rice. 3. Performing somersaults and rolls
4. Falling with tackles to enhance the impact on the opponent’s legs with the weight of your body.
Falls, somersaults and rolls can also be divided depending on the stance and height of the fall.

Rice. 4. Work by twisting when falling forward and backward
Classification of falls relative to the stand:
1. Fall from a height.
2. Fall from the stand (Fig. 2).
3. Falling from your knees.
4. Somersaults and rolls (Fig. 3).

Rice. 5. Fall forward onto your hands
Sometimes it is better to fall correctly once than to make a dozen useless movements while standing on your feet.
And finally, the last classification of falls is made according to the forms of movement and the direction of the fall.
Classification of falls according to movement patterns (Fig. 4, 5):
1. Fall forward onto your hands (three options).
2. Falling on your side:
– with twisting in place;
– with wedging;
– with hand cushioning;
– with shock absorption by feet.
3. Somersaults:
a) forward (with an exit to the belay, stance, with a heel strike):
– facing in the direction of travel;
– facing against the direction of travel;
– face perpendicular to the direction of movement;
b) back (with a stand, lying on your stomach).
4. Rolls:
a) on the shoulders:
- upward kicks;
– downward kicks;
b) on the back:
- upward kicks;
- downward kicks.
Falls often occur in everyday life, and they also happen in combat. But if in a fight a fighter often falls on purpose, for a specific purpose, for example, to escape from the enemy or strike, then in everyday life falls occur by chance and often lead to injuries. In order to avoid trouble in such situations, you should pay attention to the basic principles of such a technique as falling.
Principles of performing falls:
1. When hitting the ground, you must avoid spontaneous body movements: you must try to twist and tuck.
2. In this case, it is necessary to distribute the force of the impact on the ground over the largest possible area of contact of the body with the ground, thereby reducing the deformation energy.
3. Contact with the ground should be limited only to areas of the soft tissue of the falling body.
4. To change translational motion to rotational motion, you need to twist the body around some axis (spine, shoulders).
5. It is necessary to relax, making the body muscles less rigid and thereby reducing the speed of the fall.
6. During a fall, you should always work with your pelvis, since such movements have the greatest momentum.
7. At the moment of body contact with the ground, you need to exhale.
Goals of falls:
1. Avoid injury due to sudden contact with the ground, floor, etc.
It is worth noting that in fencing there are up to 12 sectors of protection. As one Chinese sage said, “the right hand has no business in the left pocket,” so you need to try to work with your right hand on the right side of the body, and with your left hand on the left.
2. Quickly avoiding blows, a ray of light (for example, from a flashlight), or a shot. It is usually performed in the form of a sharp fall down followed by moving to the side using various types of rolls.
3. Preparation for sharp and long jumps in various directions with a soft landing on the floor, an enemy figure, the roof of a car, etc.
For a more detailed study of all the above methods and principles, please refer to Figures 2–5.
Defense technique
When we hear the word “protection”, our imagination draws us many different pictures: medieval armor, tank armor, the latest car alarm, etc. What is protection in hand-to-hand combat? Defense is the actions of a fighter aimed at suppressing an enemy attack. In the practice of combat, there are two groups of attack techniques and, therefore, two groups of defense techniques against attacks:
1. Impacts and protection from them.
2. Grabs, throws, holds and defense against them.
Escaping an enemy's blow without leaving contact with him is the highest indicator of a fighter's level of training.
Defense techniques are also classified according to the way the defender moves:
1. Protection by movement.
2. Fall protection.
3. Protection in place.

Rice. 6. Protection by twisting the pelvis and body
All defensive techniques are divided into contact and non-contact: it depends on whether you are in contact with the enemy or not.
1. Without contact:
– with a tilt of the head and body;
- with a leg lift.
2. In contact:
– with twisting of the body around the spine;
– with twisting of the arms at the shoulders (protection from side impacts);
– with twisting the forearms, rolling back and striking from the outside.
Protection by tilting the head and body, lifting off the leg, crouching
In the Russian style of wrestling, performing tilts with the head and body is similar to the technique of classical boxing. Let's consider only defense in contact with the enemy.
The main idea of all defensive techniques of this style is to deprive the enemy of a point of support, to bring him out of balance. When delivering a blow, the enemy, already on a subconscious level, is counting on the opportunity to lean on you or return his body to a stable position due to the reverse impulse of his own blow (recoil). And if you do not find yourself in the place where the enemy’s attack is intended, he involuntarily continues to move in the direction of the attack, losing stability and balance.
Protection by twisting the body around the spine
This method of defense is effective when the force vector of the enemy’s blow is directed towards your body in a vertical plane. These are direct kicks and punches, delivered from above, below, directly.
Any technique is based on the basic laws of physics, so if you can't perform it, try to disassemble each movement separately and try again.
It is worth saying a few words about the terms used. The concept of the force vector of an enemy's blow implies a system that includes the direction of the blow and its force.
Let's look at the implementation of such protection using examples:
1. The opponent delivers a direct blow with his right hand to the chest area (Fig. 6).
Protection. First you should relax, then begin twisting your pelvis and body in a clockwise direction. It is necessary to accompany the point of contact of the opponent’s hand from the outside, rolling a wave of pectoral muscles. You should try to maintain a position so that your chest is arched, and under no circumstances change the vector of the enemy’s force. In the final stage of the reception, your body must be fully deployed, and the vector of the enemy’s force continues due to your “help”. As a result, the enemy loses his balance and falls into the resulting void. This is followed by exhalation and countermeasures. As for the point of contact of the enemy’s hand, this refers to the point of contact between the enemy’s attacking limb (arm, leg) and your own. To unbalance the enemy, the point of contact should be continuously moved, but this should be done deliberately and in the right direction, constantly monitoring the situation, which is why the term “accompany” is used in this case.
Another important detail of the technique: the opponent’s hand should slide freely over your chest. Sliding on a hard surface occurs much better than on a soft and loose one, so the pectoral muscles need to be tense. This process is called rolling a wave of the pectoral muscles. Rolling a limb with the chest muscles means that the opponent's attacking limb must slide across your chest.
2. The opponent strikes or pushes you in the back.
Protection. You should relax and begin twisting with your pelvis and body, making an exit from the outside of the forearm of the enemy’s attacking hand. Next, a smooth roll of the arm is performed with the back muscles and the continuation of the enemy’s force vector. You need to keep your back in a slightly bent position so that its surface is rounded. The enemy's force vector must be continued until he loses his balance. This is followed by exhalation and countermeasures.
– it is advisable to dodge the blow and stand in the lower frame, influencing the opponent’s hand with techniques that involve the chest or back;
– you should try to apply the principle of “sticking” to the attacking hand, moving the point of contact across the entire surface of the chest or back;
Don't be alarmed if your opponent is holding a stick in his hand, remember: the stick is just an extension of his hand.
– you should not try to change the vector of the enemy’s force, since by using force when trying to change the direction of the blow, the defender risks losing his balance;
– when twisting, the main number of movements should be made by the pelvis.
Training methods:
– resistance to force, that is, in the first stages of defense training, you only need to try to resist the force and onslaught of a conditional enemy;
– yielding to the pressure of force and determining its vector. You need to try to carry out defensive techniques while maintaining the vector of the enemy’s force;
– twisting and continuation of the enemy’s force vector tangentially to one’s body. When practicing these techniques, pay more attention to your movements.
Protection from a side impact with a stick by twisting your arms at the shoulders
If we consider a stick in the hands of a fighter from the point of view of physics, then we can note that the free end of this weapon has the maximum amount of kinetic energy. It is on this property that protection is built, three methods of which we will now consider:
1. If you are within the range of the end of the stick, move forward to the opponent’s hand, into the “dead zone” of the blow (in boxing, for example, a fighter often uses this simple technique if he enters the line of the opponent’s direct blow), and attack.
2. If you are within range of the end of the stick, step back or move to the side of the blow.
3. The most remarkable case, when you are near the middle of the stick, should be considered in more detail.
The stick is in the opponent's right hand, therefore the blow is struck from left to right. With such a blow, the vector of the enemy’s force is directed at the level of your belt, shoulders or head in a plane parallel to the ground. If you relax, then the chain of your instinctive movements will be as follows: retreating a step to the right, deviating from the stick with the subsequent intention to knock out or move the weapon with your hand.

Rice. 7. Protection from a side blow with a stick by twisting your arms at the shoulders
It is useless to describe the technique in detail, because situations are different, so we will present only its main elements (Fig. 7). Take a step to the right along the circumference of the direction of the force vector, while simultaneously meeting the stick with the outer side of your right palm. Next, move it towards you with a back-and-forth movement of your right hand in the plane of impact (this should be a movement to the left tangential to the back surface of the left shoulder). Twist your shoulder counterclockwise, keeping your right arm close to your body all the time. In this case, the body must also be twisted counterclockwise and lean to the left under the blow, transferring the body weight to the left leg. Then unload it and turn your right foot on your toes. Lower your head down to your right shoulder. Exhale.

Rice. 8. Defense against a kick by twisting the shoulders

Rice. 9. Sliding the stick along the edge of the palm and forearm

Rice. 9 (continued). Sliding the stick along the edge of the palm and forearm
Next comes the continuation of twisting the shoulders. The twisting energy of the right hand is transferred to the left, moving the point of contact of the stick with the body to the left shoulder. At the same time, the shoulder blades are brought as close to each other as possible, the head is lowered down. Start twisting your left hand, and move it forward along the direction of the stick to the left.
Twist your hand counterclockwise, while the hand moves from a palm down position to a palm up position and intercepts the stick that has slipped along the shoulder line. Exhale and, holding the stick in your right hand, continue the vector of force with your right arm or leg. Shift your body weight to your supporting left leg.
Key conditions requiring special attention:
– it is quite difficult to twist your arms at the shoulders, so do the first training sessions slowly, trying not to lose contact with the enemy’s weapon. Remember that most of the work is done inside you, so learn to listen to your body. A slow pace of exercise will help you better understand the technique of movements and get used to them;
Rice. 10. “Roof slopes” formed by hands

Rice. 11. Protection by “roof slopes” with access to the upper frame

Rice. 12. Protection with “roof slopes” accompanied by a stick to knee level
– a person has the opportunity to relax and follow his natural movements. To overcome and rethink dynamic stereotypes, it is slow movements that are most useful, because there is a chance to ease tension and follow instincts;
– slowness is a mirror image of super-speed, since an action taken to the limit turns into the opposite;
– you must be careful when moving the stick from shoulder to shoulder, lowering your head down;
– the principle of twisting the shoulders here is similar to the principle of touching the ground during a somersault;
– during a side kick, a similar twist in the shoulders is used for protection (Fig. 8).
Don't forget about the psychological aspect of the fight. The enemy feels stronger due to the presence of a weapon in his hands, so you can neutralize him with a well-practiced defense and a quick counterattack.
Defense against overhead caning by twisting the forearms
With such a blow, the force vector is in the vertical plane and directed from above along a circle described by the free end of the stick. If you are standing still, in the middle of the stick's range of action, it is recommended to act as follows.
First option. Stretch your arms up, folding them in the form of “roof slopes”. In this position, twist your forearms inward (Fig. 9). Relax and meet the blow with the outer palm of your outstretched right hand (Fig. 10). Roll your forearms inward as you squat down. These movements progressively accompany the vector of the enemy’s force along the tangential impact. Bring the stick tangentially to your right shoulder and exhale.
Second option. Use the same “roof” technique, but bring the stick to the level of your shoulders, bending your elbows. Ultimately, the forearms are placed in the position of the upper frame (Fig. 11). The starting position is similar to the first version of the technique, but accompanying the stick with the forearm in the direction of the force vector is not only rotational, but also translational; it is carried out tangentially to the right shoulder. After performing the technique, stand in the position of the upper frame and exhale.

Rice. 13. Defense against a stick strike with one hand

Rice. 14. Defense against a kick to the groin
Carry out the above technique again, but lower the stick to knee level (Fig. 12).
This technique is a continuation of the second option. Once you are in the frame, transfer the accompaniment to the outer surface of the shoulder, bending your elbows and bringing your forearms slightly closer. At the same time, lower your forearm down and the stick will slide onto it from your shoulder. In the final position, the right hand should be facing back. After performing the technique, exhale. The effectiveness of this completion of the technique is that the opponent's hand holding the weapon is low relative to ground level. In such a situation, the enemy will inevitably bend over and move his body forward. There are several other options for protection against such an impact (Fig. 13).
Defense by twisting the forearm (first method)
This technique is most effective against direct blows to the groin or stomach with the hand and foot (Fig. 14).
The force vector of such impacts passes in the vertical plane. Let's look at the example of defense against a direct blow with the right hand to the lower abdomen (Fig. 15).

Rice. 15. Protection from a punch to the stomach by rotating the body
The first method is used to protect against lower-level blows (first level from the ground), that is, blows below the belt. Relax and begin to twist clockwise around your spine. Remove your pelvis and stomach from the line of attack to the left. Meet the attacking hand from the outside with the outer part of the left forearm. The vector of the impact force is accompanied by a translational movement in the plane of its application: a rotational movement of the forearm tangentially, towards the stomach and downwards, when performing a squat. After this, exhale. In the final position, your forearm should be pressed to your stomach and turned with your elbow forward, and the back of your fist should be pressed against your body at groin level. By imparting additional energy to the blow vector, the opponent's blow fails and he loses his balance. After this you need to carry out a countermeasure.
Key conditions requiring special attention:
– use the rolling principle to continue the enemy’s force vector. Don't try to change the direction of this vector;
– twisting and accompaniment of the blow are performed simultaneously;
– all the force of twisting and avoiding the blow is concentrated in the pelvic area, and the movement of the hand only accompanies the blow;
– stepping back with your right foot to the left in a circle, perform a stand in the lower frame. Remember that the frame is direct contact with the opponent's attacking hand;
- It is not the weapon that acts, but the person. The principle of this technique is identical for any lever (stick, knife). Act in the direction of the force vector of the enemy's hand in which the weapon is located;
– you need to clearly understand the sequence of movements: rolling, continuation of the force vector, twisting or rolling in the attacking limb, continuing to extend the movement of the attacking limb and the entire body of the opponent along the force vector, at the same time twisting with the pelvis, countermeasure.
Defense by twisting the forearm (second method)
The second method is used to protect against mid-level impacts (second level from the ground), that is, impacts going to the area from the waist to the neck. With such strikes, the enemy’s force vector is in the vertical plane.
Let's consider this method of defense using the example of a direct blow with the right hand to the middle of the stomach (Fig. 16).
Relax, twist your pelvis around your spine clockwise. Move your pelvis and stomach to the left from the line of attack. At the same time, bend your left arm at the elbow and use your palm to meet the outside of the opponent's attacking arm, placing your palm on the opponent's forearm more from above than from the side. Next, accompany the vector of the direction of the enemy’s blow with a translational-rotational movement of the forearm tangentially to the lower abdomen. Sit down and exhale. After the technique, your left elbow, forearm and palm should be pressed with the outside of your body. In this position, the enemy’s blow misses, falling into the void, as a result of which he loses his balance. After this, carry out a counter move.

Rice. 16. Defense against a blow to the stomach by twisting the forearm
Key conditions requiring special attention:
– when performing a technique, it is advisable to take a step back with your right foot and stand in the position of the upper frame, fixing the opponent’s hand;
– all the force of twisting and avoiding the blow is concentrated in the pelvic area, and the hand only accompanies the blow.
Defense by twisting the forearm (third method)
This technique is used to protect against blows to the head (third level from the ground) (Fig. 17).
The natural instinctive movements when striking a head are to tilt the head and raise the arm up to create a block. Consider an example of a side blow to the head with the right fist. With such an impact, the force vector passes in a circle from left to right in a plane parallel to the ground.
There are two possible methods of protection here.
First option. Relax, tilt your head back to the right and lift your left elbow up. Start twisting your pelvis clockwise and meet the opponent's hand in the plane of the strike from below with the outer part of your left forearm.
Rice. 17. Defense against a punch to the head by twisting the forearm (first option)

Rice. 18. Defense against a punch to the head by twisting the forearm (second option)
Twist your pelvis into a squat, continuing to move your opponent's arm to the right and down, and as you rotate your forearm, bring your left elbow over your opponent's forearm. Using your forearm and elbow as leverage, curl your elbow down. Next, you can choose one of two ways: the first option is to continue twisting your elbow down, rolling around the opponent’s arm and crouching, then direct his blow to the right and down. And the second is to crouch down and strike the opponent’s elbow.
Using both options makes it possible to continue the enemy’s vector of force and throw him off balance. After performing the technique, your hands should move to the upper frame, and your forearms should control the opponent’s hand from the outside. After completing the move, perform a counterstrike.
Second option. The technique is used similarly to the previous first option, but rolling the forearm is carried out counterclockwise, from the inside of the attacking arm (Fig. 18). Step forward with your left foot and strike in a squat under the elbow when your left elbow is above the opponent’s forearm. The second option for developing the fight after the main technique is to continue the run-in, lowering your forearm along the outside of the opponent’s forearm and throwing him off balance with a punch.
“Give me a foothold, and I will change the whole world!”
(Archimedes)
Key conditions requiring special attention:
– when striking with a lever (stick, knife), the rolling should be carried out as close as possible to the attacking hand;
– after running in a direct blow to the head, you can lower your forearm down, twisting it from the inside down towards you;
– try to always be on the outside of the blow, use the inertia of the enemy and the principle of leverage.
Rice. 19. Releasing a hand grip with one hand by rotating the forearm
Release technique
Often the opponent has highly developed wrestling abilities and successfully uses various types of techniques and holds. Getting a good exit from a correctly executed grip can sometimes be much more difficult than blocking a direct blow with your hand.
Freeing oneself from grabbing the hand with one hand (first method)
Consider a situation (Fig. 19) when an opponent, superior in strength, holds your left hand with his right hand.
To free yourself from such grips, always use the principles of leverage, continuation of the force vector, rolling, and twisting. So, the enemy is holding your left hand with his right hand. The grip point is the fulcrum. Your fist forms the small lever arm, and your shoulder and forearm form the large lever arm, with the shoulder and body forming a single system. Rotate the large lever arm and body (that is, rotate the pelvis) to the right and inward, bringing your elbow into a vertical plane above the opponent’s forearm. Twist your pelvis clockwise and, sitting back to the left, break the grip ring with your body weight, while using the large lever arm to move the opponent’s forearm and fist down towards you.
In the final position, you should stand in the bottom frame, pressing the back of your fist to your groin and your forearm to your stomach. A low frame stance will allow you to control your opponent's open hand with the back of your left forearm, while keeping your elbow pointed at your opponent. Exhale and begin to carry out a bush of countermeasures.
A counterattack can be built by continuing the downward movement of the opponent's hand, while at the same time striking with the edge of the palm of the left hand to the opponent's face or throat.
Key conditions requiring special attention:
– remember that at the grip point, the hand should rotate counterclockwise, moving down and breaking the grip ring;
– do not lose contact with the enemy;
– it is advisable to pull the enemy down along the vector of force towards you, take a step back and to the right with your left foot and stand in the lower frame;
– the technique for releasing a front grip by the shoulder or throat is identical to the technique of releasing a hand grip. Add a forearm cape on top and curl it down toward you.
Freeing yourself from grabbing the hand with one hand (second method)
Let's consider a situation where the opponent grabbed your left hand in the wrist area with his right hand, while you were weaker at the point of grab. Use the force of its grip as a fulcrum around which the lever will rotate. The big lever arm is your forearm and shoulder, which are a single system.
We have already found out that the main force of rotation is concentrated in the pelvis, so squat and rotate the large lever arm with your pelvis, rotating it clockwise at the grip site around the forearm. When the small arm of the lever, that is, the hand, is turned palm up, place it on the opponent’s forearm from the outside (Fig. 20).

Rice. 20. Release from a hand grip with one hand and exit into the upper frame
While twisting your pelvis clockwise, take a step back with your right foot and begin twisting your left forearm clockwise (rolling with your hand). At the same time, extend the opponent’s forearm tangentially to your body, trying to move in the direction of his force vector. In the final position, your hands should be in the upper frame, and the outside of your left forearm should be pressed tightly to your stomach.
Key conditions requiring special attention:
– the entire weight of your body plays a significant role in twisting the forearm;
– release from a grab by the shoulder and throat is carried out similarly to release from a grab by the arm in the second way, with the only difference being that your hand is placed on top of the opponent’s hand and the forearm is twisted inward.
Releasing a hand grip with one hand (third method)
The opponent can grab the wrist, arm or neck. The technique of the reception will be the same in all cases, so we will consider the first option. So, you are grabbed by the wrist of your left hand by an opponent who is stronger than you. There are two protection options.

Rice. 21, a. Exiting an arm grip with one hand by rotating the forearm clockwise
First option (Fig. 21, a). Relax and rotate your forearm until it is horizontal at chest level. Next, turn your body clockwise and take a step back. Continue to rotate your forearm and your opponent's hand will open, releasing your hand. Squat down and increase the load on your opponent's arm by pressing down with your elbow. Move into the frame and exhale. Next, you can perform a painful hold on the opponent’s hand or carry out a hold, for example, twisting the opponent’s arm behind his back.
Second option (Fig. 21, b). Proceed similarly to the first option, but rotate your forearm counterclockwise, that is, in this case, your elbow rests on the opponent’s hand from the inside. Once your elbow is over your opponent's forearm, take a small step forward with your left foot. Your elbow should be putting pressure on your opponent's forearm as you use leverage. The opponent's hand will unclench, releasing your hand. Next, you need to exhale and perform a countermeasure.

Rice. 21, b. Exiting an arm grip with one hand by rotating the forearm counterclockwise
Releasing a two-handed grip on the hand
Consider a situation where an opponent who is superior in strength holds your arm with both hands. By combining the above methods, you have the opportunity to use the following types of protection:
1. Outward movement (Fig. 22).
2. Movement inward (Fig. 23).
3. Movement towards the center.
4. Downward movement.
5. Moving up.
6. Pull towards yourself.
Key conditions requiring special attention:
– make movements in the direction of the enemy’s force vector;
– after the reception, immediately stand in the frame;
– use sweeps under the opponent’s supporting leg;
– remember: joints are a kind of hinges, the rotation of which should be easy and natural;
– create a couple of forces by strengthening the fist of the captured hand with your free hand, that is, when leaving the grip, place your free palm on the fist of the rotating hand, thereby helping it move;

Rice. 22. Exiting a two-handed grip with an outward movement
– if several opponents are involved in the capture, do not try to free yourself, but use the principle of rotation. It is almost impossible to break out of the grip using brute physical force, so use rotation of the body, pelvis and limbs. This will help you free yourself from your opponent's hands without putting in much effort.

Rice. 23. Exiting a hand grip with both hands by moving inward
Releasing a grab by the neck from behind with one hand
Let's consider the simplest method of such protection. Before starting this technique, you need to take the following position: the chin is pulled up to the chest and rests on the elbow fossa of the opponent’s hand, the body is relaxed, the legs are slightly bent at the knees. Next, begin to escape from the grip. Resting your chin on your opponent's hand, rotate your body inward, throwing your opponent off balance. To maintain your balance, press your pelvis against it. Exhale. The technique is completed, then carry out a counterattack.

Rice. 24. Exiting a hold on the back of the neck with one hand

Rice. 25. Releasing a neck grab with one hand by twisting the opponent’s head
Grab the opponent's right elbow from the outside with your left hand and, following the vector of force, help him move upward to the left. With your right hand, hold the opponent by the hair at the back of the head and, pressing your pelvis against him, rise up (Fig. 24). With such a grab, your opponent will inevitably follow you. Now that he is leaning on you, all you have to do is crouch down, and the enemy, losing his balance, will begin to fall to the side. Lower your right shoulder slightly and force your opponent to fall to the ground or onto your knee.
Another method of releasing from such a grip is based on bending the opponent’s head (Fig. 25). Consider a situation where an opponent grabs your neck with his right hand. Relax, grab your opponent's chin over your shoulder with your left hand, and place your right hand on his elbow. Twisting your pelvis counterclockwise, press upward on your opponent's chin. When he opens his hand and begins to fall back, and you are already behind him, continue to apply pressure with your left hand to the opponent's chin. As a result, the opponent should fall to the ground or onto your knee.
Key conditions requiring special attention:
– be sure to protect your neck by pulling your chin to your chest;
– don’t panic and don’t try to straighten your opponent’s arm: he expects exactly these actions from you.
Training methods:
– imagine what the grip looks like from the side, be sure to remember the location of the force vector;
– train with a partner at a slow pace to fully understand the basics of the technique;
– if the grip has not yet been completed, block the opponent’s hand;
– when grabbing the armpits and neck from behind, proceed as follows: placing your left hand on the opponent’s chin and rising up, twist your head at an angle of 45° to the opponent.
Releasing a two-handed grip on the body
Having looked at Fig. 26, you may notice that movements are difficult only in the lower back and elbows, while the legs, head, pelvis, forearms and shoulders remain quite mobile. With the help of each of these parts of the body you can both defend and attack.

Rice. 26. Releasing the body from a two-handed grip from behind
1. Legs. The ability to attack the enemy with the heel, foot and lower leg.
2. Head. The head can be used to strike the opponent's face.
3. Pelvis. By twisting your pelvis to the right, you can gain free space in the grip and, using the elbow as a fulcrum, strike the opponent's groin, side and stomach with your free hand. It also becomes possible to make a series of throws.
4. Forearms. By moving the shoulders, you can create an advantageous position when grabbing, so that you can then carry out a defensive technique and counterattack.
5. Shoulders. Twisting at the shoulders is a very important starting element in many techniques. It involves a wide range of actions: leaving the ring and escaping a chokehold, regrouping before a counterattack.
Key conditions requiring special attention:
– relaxation and exhalation contribute to a decrease in the volume of your body, which can lead to loss of balance and a significant decrease in the ability to move and strike correctly;

Rice. 27. Release from grabbing legs with two hands
– performing squats by you will force the enemy to expend additional effort to support your body at the same level relative to the ground;
– the absence of bending forward when twisting the shoulders and body will not allow the opponent to unclasp his hands and will firmly fix him in an uncomfortable position.
Release from gripping legs with two hands
Let's consider all the key points of this situation (Fig. 27).
The vector of the enemy's force relative to you is directed backwards, the fulcrum for the enemy is your knees, and your groin area becomes the shoulder attack zone. The opponent is trying to knock you down and pulls your knees towards him and up.
When performing a defense, relax, squat slightly and lean your chest onto the opponent’s head, using the weight of your entire body. Take a step back, and if the grip is made in the knee area, bend your leg slightly. There are several options below:
1. Twisting the pelvis away from the force vector and pressing the opponent to the ground.
2. Capturing the opponent's head as he moves.
3. Twisting the spine in the form of a question mark and using a pair of forces (we are talking about the formation of a single system of twisting the spine and forearms).
Let's consider the most interesting way. With your right hand, find the first painful point - the lower part of the nose. Grab it with your hand from below and pull it towards you. This is followed by an elbow strike to the opponent’s spine. It is worth noting that this kind of capture can be prevented altogether by kicking the opponent in the face.
Key conditions requiring special attention:
– relax, do not allow the enemy to use his assumed points of support: this will make him lose his balance;
– work in several directions at the same time, move;
– if you have already fallen, do not try to break out of the grip by force, twist your pelvis and kick your opponent.
Attack techniques
To master defense techniques perfectly is, of course, a necessary condition for conducting hand-to-hand combat. But it is impossible to win only by defending and not attacking, so in all martial arts, attack plays an important role.
Painful techniques, disarming and holding techniques
The technique of painful techniques is considered one of the most difficult. But, despite the difficulties that arise in the process of training fighters, painful holds are indispensable in a close combat situation. Let's consider an example of twisting a fist with the transition to a painful hold (Fig. 28). In such a situation, the opponent holds his right arm in a bent position in front of him, and his fist is turned towards you with his thumb.
Step forward and to the left with your left foot, and then grab the opponent's fist from below with your right hand, and from above with your left.

Rice. 28. Twisting the opponent’s fist with the transition to a painful hold
Without bending over, press down on your opponent's hand with the full weight of your body. Perform movements simultaneously in three directions: extend the opponent’s arm along the forearm, moving the pelvis back and down, while rotating the opponent’s fist with both hands accordingly (left - to the left, right - to the right). At the moment when his fist is turned with his thumb to the left, extend the captured arm: first down, squatting and moving away, and then, gradually approaching, along an arcing line upward. Having achieved through these actions a significant relaxation of the opponent’s hand, press on the outer part of his elbow and, squatting, perform a painful hold on the hand so that the opponent’s elbow rests on the ground.
The opponent will eventually fall to the ground.

Rice. 29. Painful hold on fingers, hand
Working on the opponent's fingers
The general principle of working on the enemy’s fingers is shown in detail in Fig. 29.
Knocking down an arm bent at the elbow
Let's consider the case when the opponent holds his hand in front of him in a bent state (Fig. 30). A similar situation can be observed during a side blow to the head or after releasing a shoulder hold. Grab your opponent's arm from the inside so that your elbows and his elbows touch, and press the bend of your elbow onto the bend of your opponent's elbow. To continue the vector of force, take a step back and, crouching, press on the opponent’s shoulder with the weight of your entire body. Using his forearm as leverage, drive your opponent down and then sharply up. Now his only support is you. A slight push with the left hand is enough for the opponent to lose his balance and fall.

Rice. 30. Knocking down the opponent's arm bent at the elbow
Work on the head with twisting
All the main movements of this technique are shown in Fig. 31.

Rice. 31. Work on the head with twisting
Grab your opponent's head from above with your left hand and his chin with your right. Start rotating your head around the cervical vertebrae, while simultaneously twisting it back. As a result, the opponent begins to fall to the ground.
Work by twisting on the thigh
Imagine a situation where an opponent punches you in the stomach with his right foot. By being on the outside of your opponent's attacking leg, you defend yourself. Remember: the main thing in battle is dynamics. Techniques of defense and counterattack should merge into a single whole; there should be no pause between the execution of both. In this case, we can suggest you the following actions. Press your opponent's shin toward your right thigh, grabbing the heel from underneath with your right hand. A short distance from the knee, in the lower third of the thigh, there is a pain point. Place your left forearm on it and, twisting your pelvis, do a forward squat, while the direction of your movements should be opposite to the direction of the opponent’s blow. Take a small step to the left without releasing your opponent's legs, and he will be lying on the ground in front of you.
Let's consider a situation when you are facing your opponent with your left side after performing a defensive technique against a kick (Fig. 32). Grab the opponent's attacking leg from below with your right hand by the heel, pressing its shin to the top of your right thigh, and place your left forearm on the thigh just above the knee (the pain point is there). Then simultaneously squat forward and to the left, opposite the direction of the kick, and begin a twisting movement with your left hand down the painful point. Twisting your pelvis counterclockwise, take a small step to the left towards your falling opponent.

Rice. 32. Grabbing the opponent's leg
A twisting option is also possible, where you continue the vector of the enemy's force.
Consider a situation where you defended yourself from a knee strike to the stomach. Grab the opponent's attacking leg under the knee with your left hand, and grab the foot or heel from below with your right hand. Continuing the strike forward and upward along the vector of force, throw the enemy off balance with a sharp movement toward or away from you (Fig. 33). As a result, the opponent will be on the ground lying on his stomach or back.

Rice. 33. Grabbing the opponent’s leg at the knee bend
Key conditions requiring special attention:
– most pain points on the arms or legs are located at a distance of one third of the length of the limbs;
– sometimes a countermeasure has to be carried out against the direction of movement of the enemy’s strike – this is normal. In fact, by the time the attack is carried out, the enemy is no longer moving and his position is unstable;
– act in three directions at once: move the opponent’s foot up, the shin forward or backward, the thigh down.
Knee twisting work
There are many ways to influence the enemy’s knee joint; in this book we will look at three. However, there are some important points to note:
1. Never strike directly.
2. The captured limb of the enemy must be twisted in a spiral, while crouching down.
Option 1(Fig. 34). You strike your opponent with the instep of your foot under the kneecap, but the opponent does not fall, but only bends his leg at the knee. In this case, you need to continue twisting your foot under the opponent’s knee, then, slightly crouching, push under the knee with the attacking leg. In this case, you can fix the opponent’s hand or grab him by the hair.

Rice. 34. Twisting on the knee joint
Option 2. Consider a situation where an opponent who is superior to you in body weight grabs you from behind with both hands in the chest area. In this situation, we are no longer talking about a successful counterattack, but about freeing ourselves from capture. Wrap your right leg around the opponent's right leg from the inside. Now all you have to do is sit down, and the enemy, unclenching his ring of hands, will fall to the ground.
Option 3. By influencing the opponent’s knee joint, you can also free yourself from the grip on the neck (Fig. 35).

Rice. 35. Release from a neck grab with one hand by applying pressure to the opponent’s knee joint
Work by twisting the foot
The situation is this: the enemy hit you with a straight leg. Having carried out a defensive technique, you fix his leg, holding him with both hands by the heel and instep of the foot (Fig. 36). Next, start moving in the direction of the enemy’s strike vector forward or backward. It may seem unusual to you that the vector of a direct kick can be directed forward relative to you. There's really nothing surprising here. The enemy can attack by jumping back.

Rice. 36. Twisting the opponent's foot
When starting the movement, twist the opponent’s foot in a direction convenient for you. Combined with the line of your steps, the trajectory of the rotation of the foot looks like a spiral. The opponent will lose his balance and fall to the ground.
Key conditions requiring special attention:
– when rotating the foot, try to use not brute physical force, but the principle of leverage and your own gravity;
– the technique is based on the pain effect that occurs when the tendon is stretched.
Disarming the enemy: stick in one hand
One of the most commonly used stick strikes is the straight lunge (Fig. 37).
In this case, move away from the line of attack and, grabbing the stick with both hands, continue the trajectory of its movement.

Rice. 37. Driving a stick at the opponent’s broken hand
When the opponent begins to lose balance, turn the stick so that it moves towards the bend of the opponent’s hand. The hand will unclench, releasing the weapon.
You can also take a stick away from your opponent using the principle of leverage (Fig. 38).

Rice. 38. Application of the principle of leverage
After leaving the line of attack, the stick is grabbed by the end with one hand, and with the other, with a simultaneous turn of the body, almost by the base, directly next to the opponent’s hand. Turning around, lift the base of the stick up, it will again go to the bend of the enemy’s hand, and he will release it.
In essence, the same principle is used here as in the techniques for releasing the hand from a grip.
Disarming the enemy: stick in both hands
This technique is used for a side blow with a stick. Let's look at the main elements of the technique (Fig. 39).

Rice. 39. Disarming the enemy: stick in both hands
Grab the stick with your right hand by the end with a forward grip, and with your left hand by the base with a reverse grip. If the opponent holds his hand so that the stick is not visible to you, place your left hand on his hand. Start twisting the stick so that the opponent’s hand is twisted along with it. In this case, the axis of rotation is the opponent's hands.
Don't forget that all the strength comes from the movements of the legs and pelvis, the movements of the arms only set the direction. When the stick reaches a vertical position, squat down slightly and pull the top end of the stick down. The stick will begin to move towards the break of the opponent’s already twisted hand, and he will unclench both hands. The principle of leverage will not allow you to resist the movement of the stick.
Disarming an enemy holding a knife
The technique carried out in order to take the knife from the enemy is almost no different from the previous one. It is not so important what weapon the enemy has in his hand, because any object is a lever that can be used. The basics of the technique are simple: you need to determine the direction of the vector of the impact force, leave the line of attack, grab the enemy’s weapon or hand and twist them in the direction against the thumb - to the break of the hand.
Let's consider a situation where the enemy delivers a direct blow with a knife to the abdomen, and the knife is in the right hand.
First option. Grab the opponent's attacking hand from below with your right hand, and place your left hand on top of his hand. Simultaneously with the grab, move to the side from the line of attack, twisting your pelvis clockwise. Turn the enemy's hand, continuing the vector of the force of his blow, that is, drag the attacker forward in the direction of movement. As a result, the opponent will lose his balance, and his hand should unclench and release the knife.
Second option. This method of disarming an enemy holding a knife is based on instinctive movements, but it is not recommended to use it without a high level of professionalism. Moving instinctively, you will try to jump to the side and grab the enemy's weapon. So do it.
Use the knife as a lever, wrapping your hand around the blade, and move your body away from the line of attack to the left. This is the basis of the technique, then there are several options:
1. Press the blade with your right hand, lowering the lever down, and use your left forearm to hit the base of the opponent’s hand from below (Fig. 40).

Rice. 40. Disarming an enemy with a direct blow with a knife
2. There is also a “mirror” version of the first method: the captured knife blade is held upward, and a blow is struck from above with the forearm of the left hand at the base of the enemy’s hand (Fig. 41).

Rice. 41. Disarming the enemy with an overhead strike of the forearm
3. Grasp the hand near the knife blade. Having grabbed the opponent’s hand, turn your body to the left and strike with the elbow of your right hand into the elbow bend of the attacker (Fig. 42). Next, continue to twist the opponent's hand while moving his arm back. With such movements, you pinch the tendon of the hand, causing the enemy to drop the knife.
Key conditions requiring special attention:
– the principle of knocking out a knife is no different from the principle of releasing a limb from a grip. Remember: a knife grasped by the blade is an extension of your hand;

Rice. 42. Disarming the enemy with a blow to the elbow
– do not try to pull out the knife: it is useless; unscrew it or use it as a lever;
– the opponent’s hand can be unclenched by extending his thumb and little finger;
– remember that it is better to cut your hand than to risk getting stabbed in the ribs with a knife.
Disarming an enemy holding a pistol
Unlike bladed weapons, a pistol poses a much greater danger due to its enormous range. In a situation where the enemy wants to use a pistol, your main task is to quickly get out of the line of fire. Carrying out defense, as a rule, includes the following series of actions: leaving the line of fire, lightning-fast attack, grabbing the opponent’s hand and performing a painful hold on the arm.
The following option is offered to your attention. Get out of the line of fire by twisting your pelvis (Fig. 43), then place your left hand on the opponent’s hand and twist the gun in the direction against the opponent’s thumb.

Rice. 43. Disarming an enemy holding a gun
In this case, your second hand can perform a number of actions: firstly, not participate in the technique, so that it becomes possible to defend against attacks carried out by the opponent’s free hand or legs. Secondly, the movements of the free hand should help to carry out the technique, so apply it from below and begin to rotate the opponent’s hand. As effort increases, the time required to perform the technique will decrease. Thirdly, you can attack with your free hand when performing a technique.
Remember that when carrying out this technique you should use the principle of leverage (Fig. 44).

Rice. 44. Using the principle of leverage to disarm the enemy
Key conditions requiring special attention:
– when grabbing the opponent’s hand, you can grab only the upper part of it, and place your free palm on the gun to enhance the lever action;
- Many pistols have a bolt that is thrown back when fired, and if the enemy fires a shot while your hand is on the pistol, you will be seriously injured. Therefore, try to carry out the appointment as quickly as possible;
– remember that the selected pistol can be used as a brass knuckles to strike the enemy’s head.
Weapon Knockout Technique
This section provides the key points of the technique of disarming the enemy. The most important thing is to use leverage, and with what weapon is not so important. A stick, a knife, a bottle, a pistol and many other objects can equally well act as a lever. The essence of this technique comes down to the fact that the enemy holds any weapon with the same grip, and therefore the basis of the technique for knocking out the weapon will be constant. Basic principles:
1. When breaking, the opponent’s hand should make an angle less than 90° with the forearm (this can cause pain).
2. Try to strike at the enemy’s painful points, with the optimal angle between the attacking limb and the attacked surface being 45°.
3. Any technique begins with movements of the pelvis and shoulders, try to maximize the impulse.
4. The enemy’s weapon must either be knocked out of his hands and thrown into an inaccessible zone, or taken for himself.
You can deprive the enemy of weapons by influencing his pressure points. When severe pain occurs, the enemy involuntarily unclenches his hand and loses his weapon (Fig. 45).

Rice. 45. Disarming the enemy by influencing pressure points
Location of some pain points:
1. Between the bases of the thumb and index fingers.
2. At the base of the edge of the palm.
3. Between the knuckles of the ring, middle and index fingers.
4. On the inside of the wrist. A few examples of hitting pressure points:
1. Hit the base of the hand with the edge of the palm while performing a squat. Turn your body around, leaving the line of fire, and, crouching slightly to increase the energy of the blow, strike at the base of the enemy’s hand (Fig. 46).

Rice. 46. Hit the base of the opponent's hand
2. A blow to the painful point, located in the lower part of the base of the hand, is applied with the toe or edge of the foot (Fig. 47). When you strike with the edge of your foot, you begin the movement by turning your body counterclockwise. At the same time, leaving the line of fire, you gain energy for the strike by turning around and, striking the painful point, disarm the enemy. The toe kick is performed sharply and briefly from a squat position.

Rice. 47. Strike to the lower part of the base of the opponent’s hand
3. The pressure points on the wrist and between the knuckles are struck with a hand or fist. Both strikes are performed with overlap. Get out of the line of fire by turning your body and strike either with the outside of your hand in the direction of movement, or with your fist from below (Fig. 48).

Rice. 48. Hit the painful point on the wrist
Key conditions requiring special attention:
– any technique begins with leaving the line of fire;
– blows to painful points should be sliding and biting;
– any technique must be completed while exhaling.
Special techniques
It often happens in life that it is impossible to hold an open fight for a number of reasons. This section covers some of the techniques used by special forces fighters around the world.
“The master defeats the enemy” (saying of a karate teacher).
Neutralization of the sentry (Fig. 49). Having crept up to the sentry from behind, lunge forward, hitting him in the upper thighs with your shoulder, while your hands should clasp the opponent’s legs at the ankles. The sentry's legs are secured by your grip, so the impact will cause your opponent to fall forward. At this moment, with a sharp jerk, pull his legs towards you, while straightening up to your full height.

Rice. 49. Neutralization of the sentry
The opponent lies on the ground and you hold his legs. Strike him in the groin with one leg, then sit on his back and tie the opponent's hands. To make this easier, grab his hand and, turning it, move it in a circle behind the opponent’s back. When his hand is pressed to his back, perform a painful hold on the elbows: to do this, lift them up a little and, raising your pelvis, rest your hips on the opponent’s elbows. Now the opponent's hands are fixed, and yours are free. Tie his hands (Fig. 50).

Rice. 50. Tying the opponent's hands
Now let's consider a situation where you yourself act as a sentry. The main thing is to react to the attack in time, because when the enemy is on your back, it will be too late to make any attempts to free yourself from the grip. Starting to fall, twist your pelvis (the axis of rotation in this case will be the arm extended forward). The rotational energy is quite enough to throw off the enemy; After completing the rotation, strike the enemy with the edge of your palm in the neck or with your fist in the temple.
Strike technique
Each martial arts style has its own characteristics. For example, in martial arts, low stances and concentration of force in one blow are more often used. And this is understandable, because the eastern inhabitants are short and squat. But for Europeans, who are tall, such fighting styles are unacceptable. The presence of tall stature and long limbs presupposes biting side blows and a system of various types of grips. This is partly what Russian style wrestling techniques are based on.
In the Russian style martial art system, the technique of direct hard strikes is almost not considered. Such blows are a distinctive feature of hard styles. In the Russian style, most techniques are performed with an open hand, and the energy of the blow is gained through body movements. There are no rigid stances or learned movements.
Russian martial artists say that it is better to injure all opponents and come out of the fight unharmed than to hit one and die yourself. That is why kicks, for example, are delivered no higher than waist level: in this way, stability and balance are maintained, and the time spent on the blow is significantly reduced.
But besides technique, there is also tactics. Knowing the optimal combat tactics for various situations is one of the conditions for success. Below is a classification of the main tactical points:
1. One on one.
2. One against two.
3. One in a circle:
– upper level;
– lower level.
4. “Wall to wall.”
5. Crowd (every man for himself).
Of course, a separate book could be devoted to each of these tactical points, and this would not be enough, so in this case we are considering only the one-on-one option.
As mentioned earlier, there are no memorized movements in the Russian style; they are all generated by reflexes and are spontaneous and natural. But there are a number of principles that should be followed:
1. Your body is a weapon in itself. Remember this and learn to use it.
2. The blow can be delivered from any position.
3. The direction and force of the blow should be changed, but the movement should never be interrupted. It must proceed according to the “wave principle”: thus, a sea wave can change its movement and power, but it is impossible to stop it. The “wave principle” is shown in Fig. 51 and 52.

Rice. 51. “Wave principle” (moving forward)
Strike "three"
Consider a situation where you and your opponent are standing in left-handed stances. The attack looks like this: Starting a turn with your hips, you hit the opponent’s shin with the toe of your right foot, then move your body a little forward, reducing the distance, and strike with the knee of the same leg into the upper part of the opponent’s thigh (the pain point is located there). Continue the turn and, turning your back to the enemy, strike his knee from the inside with your foot (Fig. 53).

Rice. 52. “Wave principle” (sideways movement)

Rice. 53. Strike "three"
Consider the “three” made by hand. The first blow, turning the body, is applied to the solar plexus (at this point of the body there are many nerve endings). Then, bending your arm and leaning your body forward, strike your opponent's stomach or throat with your elbow. By the time the second blow is delivered, all the energy accumulated by turning the body will be spent. Therefore, start turning in the other direction and deliver a third blow to the enemy’s neck or head with the back of your hand (fist) or the edge of your palm, sharply extending the elbow joint (Fig. 54).

Rice. 54. Hit “three” with your hand
Monkey step with kick
This blow perfectly confirms the principle “you can strike from any position.” The fact is that this technique refutes the majority opinion that effective strikes are delivered only from stances.
The attack looks like this: In fact, in the first phase of the strike you are squatting with your hands on your knees - a common posture for a monkey.
From a light squat position, you begin to turn your pelvis, lowering your arms (this is necessary to create support). Pressing your hands into the ground, sharply throw your leg to the side. The blow is usually delivered to the opponent's ankle, shin or knee.
Blocks are one of the defense techniques. But before we talk about blocks, we should understand what protection is. The well-known definition of defense characterizes it as a response to an attack, consisting of a series of actions that neutralize the enemy’s attack. These actions are divided into preparation for the defense and the actual conduct of the defense itself.
Preparation for executing a block includes, first of all, recognizing the moment of attack. Keep a close eye on your intended opponent: signs such as fluttering eyelashes, flaring nostrils, and dilated pupils will warn you of an impending attack.
So, we come to the implementation of protection. In this case, we offer a block as protection. For the most part, blocks performed with the hands are a defense with the forearm, which is placed perpendicular to the attacking limb (arm, leg) of the opponent.
There are two types of blocks: power and soft. Often, soft blocks are much more profitable, since they allow you to use the energy of an enemy’s blow for your own attack (aikido is built on this principle), but they are much more difficult to perform.
Power blocks
The purpose of the power block is not only to stop the opponent's blow, but also to move his arm to the side, so the muscles of your blocking arm should be very tense. However, when using power blocks, two important factors should be taken into account. Firstly, this is the weight of the enemy. If the enemy is significantly superior to you in this (one and a half or two times), then you should take wider and lower stances. Secondly, you need to get better, as they say.
At the beginning of training, placing power blocks causes painful sensations, which, undoubtedly, can affect the result of the fight.
Upper block. This block is performed in both left- and right-handed racks. The blocking forearm moves freely in the upper part of the body, covering the stomach, chest and head. In any stance, the blocking hand is always in front of the attacking hand. The second hand is located in the hip area and is ready for an instant counterattack. The upper block is carried out at forehead level; at the moment of blocking, the arm should bend at the elbow in order to be able to absorb shock. The optimal bend angle is 90°. When blocking, exhale. This will significantly increase the speed of block placement.
The next version of the upper block is based on a rotation element. After blocking, begin to rotate your forearm outward, this will allow the opponent’s arm to move away, and his body will become open.
It is worth noting that low blows (to the pelvis, groin, legs) are delivered mainly with the legs, so they are also used to create blocks.
Also, the upper block can be performed with both hands. Clench your fists and sharply raise both arms crossed at the forearms. With such a block, the opponent’s hand caught in the “cross” of the block can be grabbed and held as a countermeasure.
Bottom block. When performing lower blocks, the blocking hand takes the position described above, that is, the stance does not change. The hand is still in the chest area and moves freely within the upper half of the body.
For side blows to the waist-knee area, your blocking hand should make a rotational movement (left hand clockwise, right hand counterclockwise) to move downward. The working surface of the block is the lower edge of the forearm. With such blocks, grabbing the opponent's leg is often used as a counterattack. For direct strikes to the waist-knee area, use the same blocks, but with further rotation to move the opponent’s leg to the side.
When kicking the groin, blocks with hands and feet are used.
Punches: clench your hands into fists, cross your arms with the outer sides of your forearms, squat down when striking and quickly lower your arms downward, moving along the axis of the body. The kick is performed like this: turn around on your right leg, lifting your left. As you strike, hit your opponent's shin with your heel.
Slope is a deviation of the body by several degrees relative to the vertical axis passing through the body (Fig. 55).

Rice. 55. Slope
Slope is one of the many types of protection. It is most often used in cases where the enemy's strike cannot be stopped or blocked; It is also used in combination with other techniques.
Slopes are performed in different ways depending on their direction and amplitude. This could be simply a tilt of the body, or perhaps a strong rotation of the hips.
The slope has several undoubted advantages that distinguish it from the general mass of defensive techniques. Firstly, the energy costs of making a slope cannot be compared with the costs of blocking. Secondly, when using a block as defense, a small, seemingly insignificant pause is inevitable between defense and attack. But believe me, there are no minor trifles in battle, and it may happen that such a pause will decide the outcome of the fight. Using a slope will avoid this delay. Thirdly, with the help of a slope you can create an imaginary reduction in the distance between you and the enemy and mislead him.
Punches
These strikes make up a significant part of any martial art. To perform an effective punch, you need to know how to do it correctly, otherwise you will not only not cause damage to your opponent, but also get injured yourself. Let's look at the basic strikes; on their basis, all the others are formed and executed.
Punch
Although you can strike with different sides of the fist, now it is worth considering the simplest, straight punch. In this case, the striking part is a platform consisting of the phalanges and knuckles of the index and middle fingers.
“If you want to learn how to fight, learn to clench your fist.”
(Chinese wisdom)
Clenching a fist starts from the fingertips. Bend them at the second joint so that the pads are pressed tightly against the first phalanx. After this, continue making a fist until your nails rest on your palm. Place your thumb on the second phalanx of the index and middle fingers and press tightly (Fig. 56). The fist must be a single system, the individual parts of which interact perfectly with each other. Remember that with a good blow, improper clenching of the fist leads to broken fingers.
When striking, the fist, wrist and forearm must be on the same straight line, representing a single vector of the blow, otherwise injury can occur.
For a better understanding, it is worth adding that with a direct strike, you can clearly outline the target of the strike. The essence of this aiming is that you should see the point you are hitting in the space between the knuckles of your index and middle fingers.

Rice. 56. Proper fist clenching
Do not forget that all the power of the blow is in the movement of the body; with the help of arm movements alone you will achieve little. The blow must be delivered with a simultaneous rotation in the hips, this way you will put not only the muscular strength of your arm into the direct blow, but will also be able to influence it with the entire weight of your body.
Key conditions requiring special attention:
– when punching directly with your fist, try to take a stance with your elbows down;
– the part of the arm from the elbow to the fist inclusive should be straight, this position will help to avoid injuries;
– when your fist comes into contact with the surface of the opponent’s body, try to rotate your hand 30–40°, this will give the blow a whiplash and provide a strong painful effect.
The technique for performing such a strike is relatively simple. The blow is delivered with the hand corresponding to the supporting leg. There are practically no body movements, with the exception of turning the body. The blow is used for attack, in rare cases - for defense (stopping blow).
Hook kick
In boxing, such a blow is called an uppercut. It is used in close range combat.
Execution technique: gather your body into a ball, concentrating all its strength in the center. Now begin to throw your hand with a clenched fist upward in an arc, while turning the hand with the back side up. The rotation of the hips will give the punch power.
The undoubted advantages of the hook strike are its power, ease of execution and the absence of the need to move.
The blow is delivered to the lower jaw or from below to the nose.
When executed successfully, a hook kick often causes the opponent to lose consciousness.
Two-handed strikes
Such strikes are very effective and difficult to block, but their correct execution requires considerable dexterity and skill. They are applied simultaneously and with equal force, at short and medium distances. The following are some examples of this type of impact.
Direct strike with two fists. The blow is performed with two fists at the upper and middle levels. Let's look at an example of a right-hand rack. Leaning back a little, make a sharp lunge towards the enemy and deliver a direct blow with your right hand to the abdominal cavity, and with your left to the head. After the hit, immediately return to the starting position. Moreover, the forearm of the right hand, starting the movement, turns with the inner side up. In fact, after striking you, you automatically stand in the top frame.
Double hand-spear strike. The blow is performed with two straight hands. The four fingers of the hand are pressed tightly against each other, forming a plate, and the thumb is bent and pressed against the palm. The forearm, hand and fingers lie on the same straight line, forming a so-called spear (Fig. 57).

Rice. 57. Spear Hand
Double blow to the ears. This strike is performed with two palms. Most often used as a stun when attacking from behind or when attacking from the front as a complement to kicks.
Performing a hand-spear strike is similar to the straight punch technique with two fists. The only difference is that with your right hand you strike the solar plexus, and with your left hand you strike the enemy’s throat.
Let's consider the first strike option. The undoubted advantage of this blow is its ease of execution, which does not require special skills. Approach the enemy from behind and strike the ears with both palms on both sides, as a result of which the enemy will be stunned and will not be able to resist.
Second option. Despite its simplicity, this blow has a significant drawback: it is very easy to block.
Based on this, in an open direct attack, this blow is best used as a complement to kicks. For example, kick the opponent in the groin or knee, and then, sharply reducing the distance, hit him on both sides with open palms on the ears.
Elbow strikes
The elbow is one of the hardest impact surfaces on the human body. In the practice of hand-to-hand combat, there are several types of elbow strikes. They are classified depending on their direction.
Elbow strikes are used over short distances and are used in a wide variety of situations.
Hit from above. This blow is used as a finishing blow. If your opponent’s body is bent, that is, his back takes a horizontal position at the level of your waist, strike your opponent’s spine or neck with your elbow. This will cause the opponent to fall to the ground. In this case, your forearm and hand should be in one straight line, and the hand, in turn, should be clenched into a fist. To enhance the impact of the blow, you can jump a little before throwing it.
Kick forward, to the side. This kick is good for attacking. From the stance, lunge and strike your opponent's solar plexus with your elbow. In this case, the forearm is turned downwards with the inner side. The blow can be strengthened by resting the fist of the attacking hand with the palm of your free hand.
Kick back. This type of strike is used when grabbing the neck from behind. Clench your hand into a fist, turn your forearm with the inner side up and strike back with your elbow. A short swing will strengthen the blow. Usually in such cases the point of attack is the enemy's unprotected ribs.
Kick up. Here you can imagine two options for such a blow. The first is used for a counterattack after breaking out of a hold on the back of the neck. Coming out of such a grip, you stand in a half-squat with your side to the enemy. Strike the chin from below with your elbow while simultaneously rising up.
The second option is used when attacking. Remember the technique of performing a hook kick. The actions are identical, but the blow to the lower jaw is delivered not with a fist (it goes by), but with the elbow and the forearm adjacent to it. This blow is quite powerful and has a short duration of execution.
Kicks
In this section we will look at some types of kicks. But before we begin to describe specific situations, let's try to classify these attacks. Classification:
1. Direct hit.
2. Side impact.
3. Spinning kick.
4. Hit from below.
5. Back kick.
6. Knee strike.
It should be noted that all kicks, regardless of their direction, are delivered from a right-handed stance.
Now let's talk about the general technique of kicking. It is much more complex and very different from techniques such as punching. It is also worth considering that when throwing a kick, your body position becomes less stable, so we will present a few general principles for the correct delivery of a kick.
1. Make sure that when the attacking leg leaves the ground, the supporting foot rests on the surface.
2. When hitting, bend your supporting leg slightly: if your knee is tense, you will not be able to absorb the impact of the blow, which can lead to loss of balance.
3. When impacting, do not tilt your body too low: if you incorrectly shift your center of gravity, you will lose your balance.
4. Remember that a blow at a short distance is weaker, but faster and more invisible, and a blow at a long distance is strong and easily detected, it is easier to block.
5. After striking, return your leg to the starting position or move, preventing the opponent from making a grab.
Direct hit
This blow is considered one of the simplest and most effective. However, it is very difficult to block or move aside.
Execution technique: transfer your body weight to your left leg, place your hands with clenched fists in front of you at chest level parallel to the body. Bend your right attacking leg and lift it so that your knee almost touches your chest. Now sharply straighten your right leg, striking the opponent's stomach. Pull the toe towards you so that the heel serves as the striking surface. The leg should be tensed only at the moment of contact with the attacked surface, thus the speed of the strike increases significantly. After the hit, immediately return to the starting position.
Side impact
This strike is quite effective and not very difficult to execute, but it is easy to detect and block.
Execution technique: transfer your body weight to your left leg, keep your hands in front of your chest, as described above. Lean to the right and lift your attacking left leg, bent at the knee, up to chest level. The thigh in this position should be parallel to the ground. Now sharply straighten it at the knee and strike the enemy’s head or body. The striking surface in this case is the instep of the foot or shin.
Roundhouse kick
This blow achieves enormous power due to the energy of turning the body.
As for the spinning kick, you should pay attention to one very important point: when turning your body, first of all you must turn to face the enemy so that you can clearly see the place where the kick is being delivered.
Execution technique: from the stance, take a step with your left foot, transferring your body weight to it, and begin to turn your body clockwise. At the same time, the right leg rises to waist level, bending at the knee, the thigh should be parallel to the ground. The blow occurs at the moment when you stand with your right side to the enemy. Sharply straighten your leg at the knee and deliver a direct blow to the opponent’s head or body. The striking surface is the heel.
Kick from below
This strike is a classic start to a fight with multiple opponents. Many people call it feminine. In fact, it can be considered the simplest and most effective.
Execution technique: transfer your body weight to your left leg, and with your right, swinging briefly, strike the opponent’s groin. The instep of the foot or shin is used as the striking surface. Such a blow will easily incapacitate the enemy for quite a long time.
Another type of such a strike is a toe strike to the opponent’s chin.
The execution technique is the same as in the first case.
Kick back
This blow is usually used in the case of a fight with several opponents, one of whom is standing behind.
Execution technique: transfer your body weight to your left leg, and lift your right kick slightly, bending at the knee. Now turn around at the same time and, leaning to maintain balance, strike back to the opponent's head, body, groin or knee. The role of the striking surface here is played by the heel.
Knee strike
It’s worth starting with the simplest blow – a knee to the opponent’s groin. This strike is performed quite simply: having sharply reduced the distance with the enemy, strike with the knee of your right leg in the groin area. After this, take a step back, taking a defensive stance, or continue a series of strikes, for example with your elbows. Other variations of the knee strike rely on locking your torso close to your opponent. Grab your opponent's shoulders with both hands and, jumping up, strike with your knee in the stomach or chest.
Sweeps
Not without reason, cutting is considered the height of skill. In a sports match or in a street fight situation, a well-executed sweep is the best way to knock your opponent down. Of course, do not forget that if your opponent is lying on the ground, this does not mean that you have won, because he can get up and continue the fight.
To quickly calculate the moment at which the opponent will not be able to resist the technique used against him, constant training in sparring is required. During such training, performance technique is also honed. The whole difficulty in performing a sweep lies in the huge risk of making a mistake and provoking a counterattack.
The above fully applies to you. If you find yourself knocked down, do not panic and drive away thoughts that you are weaker, continue to fight: for example, you can strike your opponent in the knee when he approaches you, confident in his victory.
Basically, sweeps are carried out while the opponent is attacking with his legs. The classic case is a spinning kick to the opponent.
Sweeps are very effective and look very impressive from the outside, but the technique of their execution is incredibly complex. Although it's not just about technology.
Moments in which a sweep can be used occur extremely rarely in battle, therefore, in addition to the technical side of the technique, honed to the smallest detail, an even keener instinct and the ability to instantly analyze the situation are required.
Below are the requirements that must be observed for successful execution of the hook.
1. Carefully analyze the moment when the opponent is open to cutting. Perhaps this is just a ploy, followed by a calculated counterattack.
2. The point of impact when performing a sweep should be located as low as possible on the back or outside of the opponent’s legs.
3. The blow must be sharp and strong so that the opponent’s foot can leave the ground.
4. When performing a sweep, use the combined strength of your leg and hip.
5. Carry out a sweep only if the opponent is in an unstable position.
6. Try to use the sweep either as a finisher or as the first attack.
Let's consider this situation. When kicking you in the body or head, the opponent begins to turn clockwise and throw the attacking leg forward. At this point, you should begin to rotate your body counterclockwise while squatting.
The opponent's leg passes over your head, and your body continues to rotate further by inertia. As you continue to rotate, you throw your right leg forward and strike the opponent’s supporting leg.
The impact surface is the shin or the instep of the foot. As a result, you deprive an already unstable opponent of support, and he falls to the ground.
Impact surfaces of hands and feet
You can strike with almost all parts of the body. But in a combat situation, it is desirable that the blow have a strong effect with minimal effort. Below is a description of the best impact surfaces on the human body. It is worth warning, however, that you will need extensive training before you can fully use the striking surfaces listed below in combat (Fig. 58). Hands:

Rice. 58. Impact surfaces of hands and feet
– front part of the fist;
– edge of the palm;
– fingers folded into a “spear”;
– knuckles of the fingers bent in the second phalanx;
– relaxed hand (lash effect);
- point of the elbow;
- base of the elbow. Legs:
– raising the foot;
– rib of the foot;
- knee.
Vulnerable points on the human body
For many centuries, there have been different opinions about human viability. Some people believe that a person is a fragile creature and it is very easy to cripple him; others hold the opposite point of view.
This section talks about some vulnerable points on the human body, so you should think carefully before inflicting a serious blow, many of which have irreparable consequences.
Classification:
1. Vulnerable points of the head (Fig. 59).

Rice. 59. Vulnerable points of the head
2. Vulnerable points of the body (Fig. 60).

Rice. 60. Vulnerable points of the body
3. Vulnerable points of the legs.
Vulnerable points of the head
Brow ridge. Clusters of nerve endings and small blood vessels are located here.
When struck in the brow ridge, the vessels burst, causing hemorrhage into the eyes, which impairs vision, and the impact on the nerve endings guarantees a strong pain effect.
Lower jaw. This area is located at a point located on the border of the lower jaw and ear. A blow delivered to this location breaks the bone, striking the cervical spine, causing the opponent to lose consciousness. In boxing, this point is known as the "knockout area."
Nasal bone. This point is located at the junction of the nasal cartilage and the skull, between the eyebrows.
A blow to the nasal bone causes profuse bleeding, which makes breathing difficult, also impairs vision and can lead to painful shock.
Side of the jaw. A blow to the side of the jaw breaks or dislodges the bone, producing severe pain.
Ears. Hitting the ears with your palms leads to damage to the outer ear and, as a result, to deterioration of hearing. There are many blood vessels and nerves in the area near the ears, so such a blow causes bleeding and loss of consciousness due to painful shock.
Weak points of the body
Solar plexus. This point is located in the center of the chest. This is where the largest concentration of nerves is located.
Many vital organs (heart, liver, stomach) are located near the solar plexus.
There are no ribs in this area, so it is unprotected and a blow to it produces a very strong painful effect.
Painful shock, difficulty breathing, stomach bleeding, interruptions in heart function, loss of consciousness - this is not a complete list of the consequences of such a blow.
Ribs. By their structure, ribs are the most fragile bones in humans. Therefore, fractures of the 5th-8th ribs occur even with impacts of moderate force. Broken ribs cause painful shock, and their fragments can damage vital organs.
Armpits. The armpits contain large blood vessels and nerves. Unlike many other areas of the body, they have neither bone nor muscle protection, so the sensation of a blow to the armpits is similar to a strong electric shock. As a result of such a blow, pain shock and loss of hand functionality occur.
Crotch. There are many large vessels and nerves in this area; the genital organs, which themselves are very sensitive, are located above. A blow to the perineum causes a painful shock and the danger of bladder rupture.
“A good strategy is half the success of a campaign.”
(Napoleon Bonaparte)
Coccyx. A blow to this area can damage the central nervous system and cause severe pain or even paralysis.
Kidneys located in close proximity to the posterior wall of the abdominal cavity. They do not have bone protection, so they are very vulnerable.
When the kidneys are hit, severe pain occurs, their rupture and internal hemorrhage are possible.
Vulnerable points of the feet
Knee cap. The most effective attacks are on the kneecap of the supporting leg. A blow to this area causes severe pain and immobility of the knee joint.
Outer part of the knee. A direct blow to the knee leads to destruction of the joint due to its unnatural deflection in the other direction and causes severe pain and immobility of the knee.
Inner part of the knee. A blow to this area damages the ligaments and tendons around the kneecap, causing severe pain and immobility of the knee joint.
Battle tactics and strategy
No matter how well your skills and abilities in the field of hand-to-hand combat have been honed, in a situation where you are threatened, you need to try to behave in a certain way. There are many options for behavior, they depend on specific conditions (for example, you should not show yourself in the same way when sorting out relations with a drunken company in an unfamiliar area). The following are general principles, following which you can avoid a number of troubles:
Don’t get hung up on one blow or technique, combat requires variety and improvisation, then it will be much more difficult for the enemy to predict your actions and competently build a counterattack.
1. Never reveal your weaknesses to your opponent.
2. Before a fight, don’t get confused or panic, try to calm down and think soberly. Remember: the enemy is nervous if you are confident.
3. Try to stand sideways to the enemy, this way you will reduce the area of the surface of your body available for strikes.
4. Attack and defense must be combined with each other. Remember: you can’t win a fight just by defending yourself.
5. You must remember the vulnerable points of your body; after an attack, immediately take a defensive stance.
6. One of the most important components of combat is maintaining balance. Control all your movements, do not take them to extremes. Change the direction and force of the blow, constantly maneuver, without giving the enemy a reason for a successful counterattack.
7. Try not to raise your arms high. By picking them up, you will open up many areas convenient for attack. Remember: raised shoulders protect the jaw, elbows and forearms cover the chest and stomach. Do not expose your armpits under any circumstances; they must be protected at all times.
8. Even when performing direct strikes, try not to fully straighten your arm. Leave it slightly bent to maintain mobility and maneuverability.
9. When kicking, try not to lift it high. It is necessary to use such advantages of kicks as the ability to deliver them unexpectedly for the enemy and their significant power. You cannot lift your leg too far forward, thereby becoming more vulnerable to the opponent and losing your balance.
10. All movements during the battle must be fast and clear. When taking a step back, try to compress your body, thus reducing the volume of your body, and consequently, inertia.
11. Strike quickly and forcefully. After delivering a strike or a series of strikes, immediately return to a defensive position and analyze the enemy’s state.
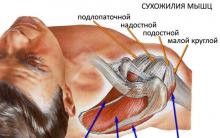


Who is the best football player in the world
Opening hours of the Olympic mass skating rink
Bullshit: how did this expression appear?
How to treat the spine with the help of physical education: exercises Amosov Amosov gymnastics
Records and heroes in the history of the Winter Olympic Games