Buying a horse means regularly using it for horseback riding, cart and sleigh rides, or transporting goods, depending on the purpose of the breed. All this requires the ability to harness the horse correctly in order to protect the animal from injury and make the work efficient. The harnessing process has its own characteristics, and it is not at all easy for a person without experience to figure it out. So, let’s take a closer look at what the harness consists of, what methods of fastening it exist, and the sequence of actions when harnessing.
Harness, like clothing for humans, must be selected individually for each horse. A properly fitted harness does not interfere with the animal’s movement and does not cause discomfort, which means the risk of injury is reduced. All this ammunition consists of several elements, each of which performs specific functions.

| Harness elements | Short description |
|---|---|
| The main purpose is to distribute the load on the shoulders and neck and enhance the transmission of traction to the cart or agricultural implement (harrow, plow). The main part of the clamp, the pliers, is made of metal or wood and consists of two halves of a curved shape. Additionally, the clamp includes a support, a clamp (soft lining), tugs, and is available in 12 sizes. It is put on the animal’s neck, and for a tight fit, its shape repeats the outlines of this part of the body. Requires precise fitting, since a clamp that is too loose clings to the spines of the shoulder blades, confuses the mane and interferes with the movement of the front legs, while a clamp that is too tight interferes with normal blood circulation and compresses the airways |
| Used to control the animal while moving. It consists of a bit and a whole set of different straps: neck, forehead, chin, noseband, reins. The bit, or snaffle, is a structure made of metal movable elements that are inserted into the animal’s mouth. When moving the bridle, the bit puts pressure on the corners of the mouth, lower jaw or tongue, urging the horse to perform certain actions. Bridles differ in design and number of elements, as a result of which they are divided into several types: bit, bitless, mouthpiece. Bridles are available in four sizes |
| The purpose is to support the shafts, arches and collar, distribute the load from the neck to the back, and soften the impact of the harness on uneven roads. The shape and size of the saddle are of paramount importance to the efficient performance of the animal. Saddles are divided into standing and lying: if the animal’s withers are sharp and high, standing ones are used, if the withers are low, lying ones are used. The first type relies on the muscles of the neck and withers, leaving the spinous processes free. The second type relies on both the processes and the muscles of the cervicobrachial region. The saddle is attached with girths and is located on the back, behind the shoulder blades |
| The main purpose is to secure the saddle and saddle on the horse's back. This is a wide belt with special fastenings. Girths are made from leather, braid, synthetic dense fabrics with gel pads. Modern girths have an anatomical shape for a better fit to the animal’s belly, and are equipped with a fleece or fur lining to absorb sweat. The belt itself has perforations that provide air exchange during movement and prevent the occurrence of diaper rash. |
| A harness is a system of belts that secure the collar when the horse suddenly stops and accelerates. A circular belt wraps around the horse's body and is attached to the pincers on both sides, the back one is located along the spine, the side ones connect the harness and shafts. The cross and side straps act as anchors for the main straps at the front and rear of the torso. The harness also requires individual adjustment, since straps that are too loose slide down the hips and interfere with movement, and straps that are too tight rub the skin |
| The purpose is to hold the shafts and collar on the horse’s back and transmit the draft force to the saddle. It is pulled through the saddle and attached at both ends to the shafts. Thanks to this belt, the weight of the harness is distributed more evenly, stress on the shoulders and neck is reduced |
| Another belt that covers the horse's belly and is connected by a ring to the saddle. It is stretched under a girth and attached at the ends to the shafts. It is designed to smooth out vibrations of the arch and collar, that is, when the horse runs fast, it protects its back and withers from sharp blows of the harness and associated injuries |
| An arc-shaped element that fastens tugs and shafts and fixes them in one position. It is made of light elastic wood and serves as a shock absorber for the shaft. Arcs are divided into several types: agricultural, traveling, dray, half-mule. According to the manufacturing method, they are divided into bent-glued and solid-bent. For the first type, larch, birch, and aspen wood is used; for the second type, maple, ash, willow, bird cherry, and elm are used. The arch is not a mandatory element of the harness and is used mainly in Russian-style harnesses |
| Thin straps used to control a horse. They have carabiners at the ends, which are fastened to the harness. They are made of ropes or soft leather, and are often combined. The main requirement for the reins is a combination of strength and lightness |


Harness can be purchased in one set, but experienced horse owners recommend purchasing each element separately, taking into account the individual physique of the animal.
Types and methods of harnessing
There are many known options for harnessing horses, and they differ not only in the type of harness, but also in the method of its fastening, purpose, and the number of horses.
Types of harnesses by harness type:
- line-by-line– the simplest option for use in agriculture. Drawbars and shafts are not used here, so the weight of the harness and the load on the animal is less than with other methods. At the same time, on a steep descent such a harness cannot hold the cart, which often leads to injuries to the horse;

- side-by-side drawbar– the harness is equipped with a bow and a drawbar designed to restrain the cart. Used in agricultural work. This harness provides stability during movement and increases the animal’s performance. Here it is very important not to overtighten the harness, otherwise the drawbar puts more pressure on the collar and causes damage to the shoulder area and withers;
- shaft-linear– characterized by the absence of an arc. The clamp is connected to the shafts with separate fasteners made of metal or leather. If short shafts are used, they are connected to the saddle. This method is common in a number of European countries, and therefore is often called the English harness;

- shaft-arc- considered a domestic type of harness, it is almost never found in Europe and Western countries. Used in agriculture and transport. Using a wooden arc, a connection is made between the clamp and the shaft, while the arc prevents the pincers from everting out and increases the animal’s performance;

- mixed– combines 2-3 types of harnesses and allows you to use several horses at the same time. Characterized by the absence of an arc, it is most often used for transporting people or cargo, and is not suitable for rough roads with steep descents and ascents.

Based on the number of horses harnessed at the same time, harnesses are divided into pairs, singles and multi-horses. In the steam room, animals are located in 2 ways - next to each other or one after another. The first option is called a pair, the second is a tandem, or train. In both cases, either a line-by-line type of harness is used, or a mixed one.

Multi-horse harnesses can only be of mixed types. Each horse, depending on its location, has its own name. The main one is considered to be a rooter - an animal harnessed either to a drawbar or to shafts. He drags the cart and slows it down on slopes, which requires endurance and great physical strength. That is why the strongest and tallest horse is chosen as a horseman. An outrigger horse is harnessed in front, and a harness horse is harnessed near the root horse.
Three horses can be harnessed in a row (Russian troika), in a train, or in European style - a main horse and two outriggers in front. For a narrow road, this method of transportation is more convenient. For four knights, two methods are used: a pair of outriggers in front of a pair of molars (quadriga) and four knights in a row (quadriga).


A team of five animals is called a five-piece team. Only one option is used here - three outriggers are arranged in a row, followed by a pair of outriggers. The six represents three pairs connected in series. There is no practical sense in harnessing a larger number of animals, but such harnesses are often used in various entertainment and special events.

Harness rules
To properly harness a horse, you first need to check the integrity of the harness and make sure that all the elements are present. A faulty harness should not be put on an animal: during movement, the straps may burst or loosen, which will lead to injury to the horse. When hit, the cart can also be damaged and overturn, especially if the road is uneven. The cart itself should also be inspected, checking for lubrication in the wheels to make it easier for the horse to pull it. After making sure that everything is in order, you need to choose an open, convenient area in the yard and roll out the cart. You also need to take the harness there and carefully lay it out.
The next stage is preparing the horse. The animal must be in a calm state, otherwise nothing will work. If a horse jerks its head, rushes about, kicks with its hoof, it is better not to approach it, especially for those who do not yet have much experience with horses. Before harnessing, be sure to check the skin on the chest, withers and shoulders of the horse: first visually, and then run over these areas with your hand. If a horse reacts painfully to touch, this indicates health problems, which means it cannot be harnessed. If there is no reaction, as well as visible damage to the skin, you can begin the harnessing process.
Step 1. They take the bridle in their left hand, slowly, calmly come close to the horse on the left side, clasp the head with their right hand and bend it slightly towards their shoulder.


Step 2. Carefully place the reins over the neck over the head, straighten the bit and insert it into the horse's mouth so that it does not touch the teeth. At this time, the bridle is lifted with the right hand and the ears are threaded between two straps - the back of the head and the forehead. They adjust the straps on the cheeks and the hair on the forehead so that they do not get tangled.
Step 3. Straighten the belt under the horse's lower jaw and fasten it. You can’t tighten it too much - your fist should fit freely between your throat and the belt.
Step 4. The noseband is fastened next, leaving a gap between the skin and the belt no more than two fingers wide. They check whether folds have formed on the horse’s lips, inspect the straps again, correcting twisted areas if necessary.
Advice. If the horse then begins to buck, twist its head, or make sudden movements, this means that it is experiencing discomfort. Perhaps the bridle elements are not the right size or are too tight. In this case, you need to remove everything, let the horse calm down and repeat everything again.
Step 5. The horse is brought to the cart, the saddle is placed on its back, closer to the neck, and the girth is tightened on the right.

Step 6. They take the collar, turn it towards themselves with the pliers, adjust the harness, and thread the reins. Now you need to grab the pliers (in the part where the tugs are fixed), place them on the animal’s neck and slightly move them towards the head. After this, the pliers are lowered into the desired position, and the mane is carefully released from under them.

Step 7 They approach the horse from the left, lift and straighten the harness at the withers. The straps are threaded through the buckles and tightened so that between them and the ischial tuberosities there is a gap of the thickness of the palm.


Step 8 Next, they approach from the side of the head, take the bow in one hand, the reins in the other, and lead the horse into the shafts. A belt of the midsection is looped over the shaft on the left, then the abdominal belt, and one end of the arc is inserted. Throw it over the neck and secure the second end to the right shaft.


Step 9 The shafts are aligned in length, the arc is installed vertically, the soup is removed from the loops of the tug and the pliers are wrapped in it 2-3 times. Pull it all the way so that the pliers close. The arc and shafts must remain at right angles relative to each other.


Step 10 The saddle strap is passed under the shaft, and its end is tied on the shaft with a loop. The underbelly is also pulled up by threading it through the hole in the girth.


Step 11 Raise the reins, straighten them well, and thread the left end into the ring on the tug. Now you need to stand in front of the horse, throw the reins to the right side, thread the right end of the reins and fix it on the bit ring.

Step 12 The abdomen and midsection are pulled up, and both ends are tied with a loop on the side. Such knots allow you to quickly unharness the animal in emergency situations, but ordinary knots, on the contrary, only delay the process.
At this point the harness is considered completed. Of course, in the absence of experience, not everyone will be able to immediately understand the harness using instructions alone; a clear example is important here. Much depends on the character of the horse, because it is almost impossible for a beginner to cope with a frisky and restive animal. It is best if the basics are shown by someone experienced who has been working with horses for a long time.

How to unharness a horse
You also need to remove the harness from your horse correctly. If the animal was carrying something on itself, first remove the load and let the horse walk quietly for about 10 minutes. Next, loosen the girths a little and, if the horse is still agitated, again leave it to walk for 10-15 minutes. After this they begin to unharness:
- unfasten the reins, pull them out of the arc rings, throw them off the neck;
- untie the knot of the underbelly and midriff, remove the straps from the shaft;
- untie the supon, loosen the clamp and carefully remove the arc;
- they lower the shafts, take the horse out of them, remove the harness;
- unfold the collar with the lining up, lift and remove the horse over the head, remove the saddle.
After removing the harness, you should carefully wipe the animal from sweat, if it is cold outside, cover it with a blanket for a while or take it to the stable.

After this, you need to check the harness, dry it, and carefully fold it so that the long straps do not get tangled.
Video - How to harness a horse
Igor Nikolaev
Reading time: 4 minutes
A A
In the city, the ability to harness a horse is useful to few. Unless people who organize horse riding as a leisure activity must have these skills. But residents of rural areas still often use these animals when running their farms, since horses are often cheaper than a tractor or car that constantly requires refueling.
Here you can’t do without the ability to saddle a horse correctly or harness a horse to a cart (in summer) or to a sleigh (in winter). Without the proper experience and knowledge, harnessing an animal can be fraught with certain difficulties. To remember in detail all the stages of this process, you need to do it not once or twice, but a large number of times. However, you always have to do something for the first time. This article is dedicated to the correct sequence of this process.
Before you start harnessing a horse, you need to understand what is included in its harness.
Any harness has the following necessary elements:
- bridle. It is the main part of horse harness. Its purpose is to control the horse while moving. A bridle consists of the following elements: a bit, its rings, a nape strap, two straps placed on the cheeks, one strap on the chin and one on the forehead;
- clamp The main purpose is to transfer traction from the horse to the cart. Consists of: pliers, tugs, the clamp itself, a tire, a felt lining, a collar and a ring. To avoid squeezing the animal's neck, the collar must be free;
- saddle. A special device used to secure and support the harness. With its help, the horse pulls the cart 15 percent better;
- girth. A device for attaching a saddle to a horse;
- harness. One of the most important elements of the harness. With its help, the clamp is held in place. It also prevents it from slipping if the horse accelerates sharply or, conversely, brakes. Consists of a set of straps that regulate the position of the horse in the harness and keep it in it;
- saddlemaker. It is a belt that passes through the saddle and is attached to the shaft of the cart. It is he who holds the collar, arcs and shafts on the horse's back. The interleaver is also involved in the transfer of traction from the animal to the cart;
- sub-abdomen It is attached under the girth and secured to the shaft. Looks like another strap;
- rein. Purpose – control of a harnessed horse;
- arc. Last on the list, but not the least important, is the harness element. Serves to connect the clamp and shafts. The arc is attached with the help of tugs and is a kind of shock absorber that softens the shocks and jerks of the cart, thereby facilitating the work of the animal.
So, we figured out what the harness consists of. It's time to move on to harnessing the horse to the cart. We will describe the stages of this process using the example of a one-horse Russian team.
Proper harnessing of a horse consists of sequentially performing the following actions:
- inspect and clean the horse. Then inspect visually and check with your hands all elements of the harness for their integrity. Make sure that there are no abrasions, tears or other weak spots on any of the elements. Compare tugs by length. If they are different, align them, otherwise the harness will be skewed and normal movement will not work;
- after a preliminary inspection, bring all the elements of the harness to the harnessing point;
- the abdomen and the pars are connected by one ring. Take them and pass the straps through this ring to create a loop. Throw this loop over the shaft;
- then put a collar, saddle and bridle on the horse itself. The saddle should be placed so that it is on the lower part of the animal’s withers. Its optimal location will still need to be looked for, since on the back it is too low, and at the withers itself it is a little high. The clamp should only be put on with the pliers up, and only then lowered onto the neck and turned over to the working position. You need to place the collar so that it comfortably covers the animal’s neck;
- We place the harness on the horse’s withers and begin to straighten it. The straps need to be connected to the buckles. We tighten the straps so much that a human palm fits between them and the ischial tuberosity;
- we lead the horse into the shafts. This can be done in several ways: either the horse steps over the pole, or it is led in reverse, or the shaft itself is rolled onto the horse standing motionless. The latter method is usually used when harnessing a young or timid animal;
- we take the arc and stand in front of the horse’s muzzle, looking at it. We lean the arc against the horse’s right leg, and with our left hand we twist the tug until it reaches the desired length;
- We leave the tug on the edge of the shaft. We take the arc and insert its left edge into the horse-drawn loop, and throw the right edge over the shaft pole, which should be in the cutout. The arc itself should be on the horse's neck;
- We approach the second shaft and turn the arc towards it so that it falls into the recess. We place the tug on the shaft, and attach it to the arc with a loop;
- After this, we tighten the clamp, wrapping its pliers with supony until they close. In this case, you need to make sure that the angle between the arc and the shafts is 90 degrees;
- We tie the horse to the pole of the left shaft. We insert the clamp after pulling the animal one step back;
- We put the elements of the harness on the animal’s head. We put a rein around the neck and attach the lanyard to the tug. This should be done so that after fastening the horse can raise his head. To prevent them from dangling, we throw the belts over the shafts;
- Lastly, we attach the reins to the bits. It is best to pass one rein over the tug, and the second under it.
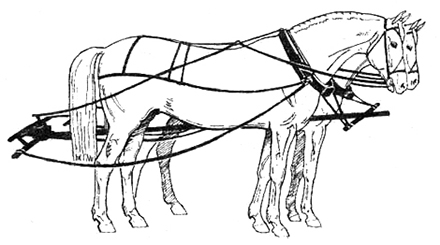
Single shaft-arc Russian harness
Currently, three main types of harnessing these animals to a cart are used:
In European countries, multi-horse teams are divided into four-horse, six-horse and eight-horse, depending on the number of horses.
There are such types of harness:
- arc;
- arcless;
- transport;
- away
When harnessing two horses, a drawbar harness is often used.
Often such a harness is the only one available when performing agricultural work. However, to use this method, the cart or sled must have a drawbar in advance. It is another shaft, which is attached in the middle.

Each person understands different things by vacation: some are attracted by a sunny resort, others go to conquer mountain peaks. There are also people who only dream of going to the wilderness, to a village, and for a while to take a break from all the benefits of civilization and the turmoil they bring, and try to live as its regular inhabitants live: fetch water from a well, clear the path of snow , harness the horse. While everyone can handle the first two points, not everyone can independently prepare a horse for a ride. Let's look at how a horse is harnessed.
The harness is essentially a set of accessories connected together for harnessing a horse, with the help of which you can attach any kind of carriage to the animal for travel:
- sled;
- cart, etc.
Without a harness, it is impossible to use a horse as a driver for several people or cargo, since in any other way it is impossible to attach the carriage securely for a person and comfortably for an animal.

The harness consists of many different elements interconnected to connect a vehicle to the animal.
Let's look at what components the harness consists of.
Table 1. What does the harness consist of?
| Detail | Description |
|---|---|
| Bridle | With the help of a bridle, the driver can control the horse, telling it where to go and at what speed. It is part of the harness and consists of: · bit; · bit rings; · occipital strap; · cheek straps; · frontal belt; · chin strap. |
| Clamp | This part is the component that transmits the horse's traction to the cart that the animal is pulling. Clamp details: tugs; · ticks; · felt lining; · clamp; · tire; · mountains; · ring. If the collar is made too narrow, it can squeeze the animal’s neck, making its movements uncomfortable, therefore, the collar is always made loose. |
| Saddle | This detail is also part of the harness. Its tasks are: · secure the harness; · support her. Provided that the saddle is made well, it can increase the horse's initial traction by about 15%. |
| Girth | This device is a saddle clamp on a horse. It also holds the clamp, ensuring its constant, fixed position even during: · acceleration; · braking. The girth is made of belts. |
| Intersaddler | This part is also a belt, which, running through the saddle, is attached to the shaft. The function of the saddlemaker is to keep the horse on: · clamp; · shafts; · arcs. In addition, the harness also works to transfer traction from the animal to the cart. |
| Podbelly | Another belt attached to the shaft. Located one level below the girth. |
| Rein | The role of this part is to give the driver the opportunity to control the horse throughout the trip. |
| Arc | This element connects: · clamp; · shafts. In this case, tugs are also used. In fact, the arc plays the role of a shock absorber, which tries to soften all the blows and jerks of the cart that could potentially harm the horse. |

How to harness a horse
Now that we have figured out what a harness is, we can move on to consider the procedure for harnessing a horse into it. It is far from being as simple as it might seem at first glance, so read more carefully.
Instruction No. 1 - how to harness a horse
Step #1 – cleaning and inspection of the horse
A good owner knows: before traveling anywhere and harnessing an animal, you need to inspect and clean it. The fact is that wounds on the animal’s body, if any, may increase due to the high load, or they will be rubbed by the harness straps. A sick animal should not take you somewhere at all; on the contrary, it should gain strength.
It is necessary to clean the animal so that the dirt mixed with sweat is not rubbed into the animal’s skin, causing the development of inflammation.

Cleaning the animal is carried out in several stages:
1. First, we will work with a rubber scraper, with the help of which we will collect from the fleshy parts of the animal’s body:
- dirt;
- foreign objects that could get stuck in the horse's fur.
Using circular motions, move the groomer over the horse's entire body, avoiding:
- front part;
- protruding bones;
- spinal zones;

2. Then we will move on to cleansing the horse’s body using a special brush equipped with hard bristles. With this we will carefully comb the wool, taking out from it what the comb could not remove. In addition, with this brush:
- dead hair is combed out;
- The horse's skin is massaged, thereby improving its blood circulation.
However, you should not comb your hair and mane with the same brush, just as you should not touch it:
- horse's muzzle;
- stomach;
- other “short-haired” parts of the body.

3. Next, a brush with soft bristles is used, with which the process of cleansing the horse’s body is completed. It removes small traces of dirt by combing and massaging the horse’s body even more actively. It can already be used to comb all areas of the body, however, taking extra care in the area of the facial area.

Please note: there are special brushes for cleansing the faces of horses, and it is, of course, better to use them during the cleaning process.
- muzzle and eye area;
- under the tail.
Since these areas are always overly moist, mucus and other substances can accumulate in them, which accumulate bacteria, which then penetrate the animal’s body and disrupt its functioning.
5. After the main procedures are completed, it will be necessary to comb the mane and tail.
6. Finally, if you harness a horse in the summer, it will be useful to spray its skin with a special remedy for annoying insects.
Step #2 - inspect the harness
Having taken care of the beauty and health of the horse, you need to think about its comfort and safety by checking the integrity of the harness. You should take the device and look through every inch of it, looking for:
- cracks;
- ruptures;
- rubbed areas, etc.
If you find them, you will need to replace the unusable part of the harness. If you really can’t do this, then take another device, newer and intact.

Step #3 - let's start harnessing
So, first take the ones connected to the ring:
- saddlebag;
- sub-abdomen
To make a loop, we need to pass the straps through the desired ring. The resulting circle of belts must be put on the shaft.
- clamp, while placing the pliers in the upward direction, and only then lowering the part onto the neck and turning it over;
- the saddle, laying it so that it is not on the back and not on the withers, but somewhere on the lower part between them;
- bridle.

- belts;
- buckles.

It is necessary to tighten the straps exactly until a human palm fits between them and the ischial tuberosities.
Step No. 4 – we lead the horse into the shaft
We have come to the stage when it is time to bring our ward into the shaft prepared in advance for the trip. This can be done in three ways:
- roll the device onto the animal, which is quietly waiting in a standing position;
- force the animal to step over one of the poles of the device;
- drive the horse into the shaft in reverse.
The first method is perfect for working with young stallions and mares that are not yet experienced and timid.
Now you will need to take an arc and stand directly in front of the animal, while looking at its face. Now the arc needs to be brought closer to the right limb of the horse, and on the left side the tug must be adjusted to the required length, subsequently securing it right at the end of the shaft.

Install the left end of the arc into the loop of the tug, and the right one will need to be moved through the shaft.
The free shaft will need to be brought closer to the arc, having first turned it with the notch in the desired direction. Then, by analogy, the tug is laid along the shaft, and the loop is attached to the arc.

- tighten the clamp;
- Using pliers, tightly tighten the soup.
Now carefully ensure that the shafts and the arc are located at right angles to each other.


Step No. 5 - move on to harnessing the head and neck
So, now we need to put a rein around the horse’s neck, and attach an element such as a lanyard to the tug, making the connection in such a way that the horse still has the opportunity to raise its head. The belt part of the device must be thrown over the shafts so that they do not hang freely.

Now let's attach the reins to the bit:
- one of which must be carried under a tug;
- and the second above the tug.
Hurray, you harnessed your own horse for the first time, congratulations!
Video - How to harness a horse
How to unharness a horse
Perhaps many of you will be surprised, but you also need to be able to unharness a horse correctly. Now we will tell you how to do this.
Instruction No. 2 - how to unharness a horse
Step No. 1 – remove the load
In order not to cause great damage to the body of the horse carrying the load, before removing the harness and other equipment from it, you need to remove the desired load and let the animal walk around without it for about 10-15 minutes.

Even if the horse was carrying a small load, give it some time to recover after the ride
Step No. 2 - loosen the girths

Step #3 – we complete the unharnessing
As soon as the 15 minutes we indicated earlier have passed, you will need to unharness the horse to the end by doing the following:
- first disconnect and pull the reins out of the arc, and then throw them off the neck;
- untie the knot of the abdomen, as well as the saddle;
- remove the straps from the shaft;
- unwind and remove the soup;
- slightly loosen the clamp and disconnect the arc;
- lower the shafts and lead the horse out of them.

Step #4 – we carry out additional procedures
Your horse worked hard to ensure that you rode quickly and comfortably. You need to thank him for this by looking after him after removing the harness.

If it’s a warm summer outside, you need to thoroughly wipe the horse from sweat with damp rags. And vice versa, if it’s cool, then you need to cover your pet with a blanket and take him to the stable.
Step No. 5 – processing the harness
The removed harness must also be thoroughly cleaned and checked for damage caused during use. If any are found, immediately have the device repaired.
Harnessing methods
The type of harness that you met in the above instructions is far from the only way to put a harness on a horse. In fact, there are several types of harnesses. In our country, three of them are most often used:
- one horse harness;
- harness of two horses;
- harnessing many horses.
In Europe, the last of these types of harnesses is also divided into:
- a four-horse team;
- six horses;
- eight horses.

In addition to the fact that the number of horses in a harness may vary, the harness itself is also made in different versions:
- arc;
- without arc;
- transport;
- away type, etc.
Of course, if you are an amateur and just got aesthetic pleasure from the procedure of harnessing a horse, then you can get by with the simplest options. However, experienced horse breeders and village residents, for whom horses are still important assistants in the household, will have to explore several more possible options.
Video – European harness
Let's sum it up
How to harness a horse is a question that sooner or later lovers of these graceful animals will want to ask. And it doesn’t matter whether you became a horse breeder, or just went to such an unusual entertainment, or went to live in the village. The main thing is that you had to comprehend this science, and now is the time to do it. Don’t forget that it’s not enough just to learn how to harness a horse mechanically. You need to develop intuition in order to begin to understand how the animal is comfortable and how it is not, how the harness will wear out less. An efficient owner will spend very little time figuring it out, and if he has the desire, everything will work out.
Horse harnessing method
The first letter is "v"
Second letter "s"
Third letter "n"
The last letter of the letter is "c"
Answer for the question "Method of harnessing horses", 5 letters:
take out
Alternative crossword questions for the word takeaway
Removing the body from the apartment for funeral
In the Moscow state - the duty levied for unloading goods
Big win
A method of harnessing horses, when one or more of them are harnessed from the side or in front
Method of selling beer
Export on your own
Moving, delivering outside, outside of something
Definition of the word takeaway in dictionaries
New explanatory and word-formative dictionary of the Russian language, T. F. Efremova.
The meaning of the word in the dictionary New explanatory dictionary of the Russian language, T. F. Efremova.
m. Process of action according to meaning. verb: to take out (1,2,4,6). Exit with the body of the deceased for burial. m. A method of harnessing horses, in which one or more of them are harnessed from the side or in front. Driving with such a harness. Each of those harnessed in this way...
Explanatory dictionary of the Russian language. D.N. Ushakov
The meaning of the word in the dictionary Explanatory Dictionary of the Russian Language. D.N. Ushakov
takeaway, plural no, m. Action according to verb. put in 5 digits (specialist.). Bringing your left leg forward. Carrying out (the deceased) for burial. Removal from the apartment. Carrying the body to the crematorium. A method of harnessing horses, when one or more of them are harnessed from the side or in front....
Examples of the use of the word takeaway in literature.
Arslan and Aibek were surrounded by others, those who were busy removal soil.
Although a firewall can protect against unauthorized access to critical data, it does not protect against employees copying data onto a tape or floppy disk. removal it outside the network.
But the monuments of the river, in the form of sandy takeaways, still lay on the herd estate, and to cover them, twigs of shelyuga and black grass were planted in the sand, and between those twigs and native burdocks lay overnight empty pumpkins of great size.
When foreman Shpator swooped like a rooster on Buldakov, on Kolya Ryndin, the new settler of the first company Poptsov, who had already been worn out in the garbage dumps, had lost his life on the firewood, had washed himself from washing the floors and taking out sewage, suddenly went on the offensive: - Barefoot and naked, no one.
The stage smells like an abandoned house, an unsung song, Oh, how it smells like a beer fence and social gossip, Ash, sweat, a dog sled, a stupid joke, Powder, roach, a holey vest, a cheap puncture, And solemn removal the rubbish of the backstage hell, It smells very much like the offended gaze of a forgotten child.
Shaft-arc “Russian” harness
Shaft-arc harness sequence
Before harnessing the horse, it is necessary to check the condition of the convoy (cart or sleigh); check the tugs on the clamp. Adjust their length so that when harnessing the horse with a harness, you can pull the clamp pliers together and strengthen the arc on the shafts. After this, they put the bridle on the horse, fasten the chin strap, and insert the bit into the horse’s mouth. If this happens in the cold in winter, then it is necessary, before inserting the bit into the horse’s mouth, to warm it in your hand. Then they put a saddle on the horse, making a movement from the withers to the back, along the course of the fur, and fasten the girth to the throat of the saddle. The collar is placed on the horse's head with the pincers facing up. After the horse's head passes through the hole in the clamp, it is turned with the pliers down. This should be done in the direction of mane hair growth. Straighten the harness and free the mane and tail from under the collar and harness. Then they take the bow, reins, saddle and belly in one hand, the reins of the bridle in the other and lead the horse out of the stable.
Before harnessing, a saddle piece and an underbelly are put on the left shaft at a distance of approximately 40 - 50 cm from the end of the shaft. Then a shaft is placed on the left tug of the clamp, a branch of the arc is inserted into the resulting loop and the arc is transferred through the animal’s neck. After this, they lift the right shaft from the ground, apply it to the right branch of the arc and clasp the end of the arc with a tug from above through the shaft. The arc should be laid at the same distance from the ends of the shaft. The soup is wrapped 2 times around the pliers of the clamp and tightened so that the pliers come together. If necessary, to tighten the suponi, rest against the right pincer with your foot and tighten the suponi with the strength of your arms and body. They wrap the soup one more time, insert the free end between the soup and the pliers and drag it under the soup. Pull the soup so that a small loop remains, pull the end of the soup back and wrap the remaining end around the loop. This is done so that, if necessary, the soup can be dissolved with one jerk. After tightening the suponi, the arc should hold firmly on the shafts. When striking with your hand, the arc should not deviate back or forward.
If the arc is held weakly, it is necessary to remove it in the reverse order and shorten both tugs. If it is impossible to pull off the pliers, then the tugs should be increased. In this case, it is necessary to ensure that the horse’s collar does not compress the horse’s neck, but fits tightly to it. The saddle piece is threaded through the rings of the saddle, passed under the right shaft and pulled up so that 2-3 fingers can be inserted between the withers and the clamp and between the neck and the clamp. The end of the saddle is wrapped around the shaft. At the same time, a loop is made so that it can be unraveled with one jerk.
The underbelly is passed through the belt loop of the girth and pulled tightly to the right shaft. The reins are crossed, thrown over the neck and pulled into an arc ring. You can skip the reason on one side (without the mane); they pull it through the chin strap of the bridle and the end is also passed through the arc ring, wrapped around the arc or directly tied to the shaft on the right side. The reins should not restrict the movement of the horse's head. They stretch the reins over the saddle and tugs on both sides of the neck and fasten the reins to the bit rings, hold the reins in their hands and sit on the right side of the cart.
Ivanova G.V..
Horse harness
Practical guide
Sooner or later, most Vyatka owners have a desire or need to harness a horse to a cart. But not everyone has an experienced assistant at hand, and in books you can find only very superficial instructions on harnessing.
Therefore, I will describe here not only the order of harnessing, but also some of the subtleties of fitting the equipment.
To begin with, let’s talk about the structure of the harness and its purpose.
Harness (harness)- a device for harnessing a horse to a cart. The harness must be selected for each horse and precisely adjusted to it in order not to cause traumatic injuries, to ensure free movement of the limbs and body, and not to impede the animal’s breathing during work.
There are several types of harnesses. We will look at the composition of the Russian single-horse arc harness.

- bridle with rein
- clamp
- saddle
- girth
- harness
- saddle and abdomen
- rein
- arc
1. Bridle.
Used to control a horse.
By changing the length of the head and cheek straps, the bridle is adjusted to the horse’s head so that the bit slightly raises the corners of the mouth by 1-2 folds. The forehead and carrying straps should lie loose enough so that 1-2 fingers can be inserted under them. Your fist should fit freely between the ganaches and the chin strap.
If the owner does not want to use the bit, he leaves the bit under the chin; control occurs due to the pressure of the portable belt on the horse's nasal bones.

1. bit(snaffle)
2. bit rings(snaff rings)
3. criminal(occipital) strap.
4. 2 cheek, which securely fix the bit in the horse’s mouth.
5. chin which prevents the bridle from slipping forward from the horse's head.
6. forehead which prevents the bridle from slipping back onto the horse's neck.
7. portable, for additional fixation.
8. leash with lanyard(9), for securing the horse at the hitching post and driving it on the bit.
2. Clamp. Serves to transfer the horse's draft force to the cart (85-88%).

- clamp
- ticks
- soup
- tugs, for connecting the clamp with shafts and arc.
- tire
- felt lining
- Gort- belt for fastening the harness.
- rings, for reins (based on tugs)

The size of the collar is determined by the length and width of the horse's neck. Length is measured with a rigid meter. To do this, it is placed along the base of the neck and the distance from the crest at the beginning of the withers to the glenohumeral joint is measured. To the resulting figure, add 6 cm for a cart clamp, 3 cm for a passenger and arable clamp. The width of the neck is measured with a Wilkens compass in the widest part - at its base.
|
Clamp No. |
clamp length |
clamp width |
|
Tolerance + 0.5 / + 0.2 |
||
The length of the clamp is measured from the upper inner point of the clamp lining to the lower inner edge of the pliers, and the width is measured at the level of the horse-drawn openings.
A correctly fitted collar rests on the inside of the neck crest at the beginning of the withers, and on the sides lies on the muscles located in front of the axis of the shoulder blade; in the lower part of the shoulder blade (at the glenohumeral joint) the clamp is located above the hawk, at the base of the neck.
Approximately when dressed, the palm should extend with an edge from the collar (inner part of the collar) to the upper part of the humeral tubercle.
The clamp fits:


The clamp is large - the clamp almost lies on the shoulder-scapula joint and hangs over the sternum:


The clamp is small in size - it compresses the neck muscles on the sides; on top the collar lies high above the withers; the bottom of the collar lies at the base of the neck, high above the sternum. 

3. Saddle. Serves to secure and support the entire harness through the harness and transfer the draft force to the horse's back (12-15%).
The saddle can be humpbacked (for horses with high withers) or recumbent (for well-fed horses with low withers).

- archak
- shelves
- sweatshirt
- lid(leather or linoleum)
- rigs(gorts)
- temples, through which the stringer is passed
4. Girth. Designed to hold the saddle on the horse's back. The girth has a leather patch with holes for threading the underbelly.
5. Harness. Serves to hold the collar in place when the horse is descending from the mountain, sharp braking, or settling down.
The harness is adjusted so that the palm of your hand fits between the ischial tuberosities and the headband.

Consists of several belts:
1. rim(side). It goes around the horse on the sides and behind. Has buckles for attaching to a collar.
2. longitudinal. Runs along the spine. It also has a buckle for attaching to the collar.
3. 2 slope belts. Start from the longitudinal end on the horse's croup.
4. 2-3 side straps. Connect longitudinal and rim.
5. loops(lobes), for additional fixation of the harness (sometimes with decorative tassels)
6. Intersaddler. The belt passing through the saddle is secured at both ends to the shafts. Supports the mass of the collar, arc and shaft on the horse's back, transfers part of the draft force to the saddle.
Podbelly. The belt passing under the girth is secured at both ends to the shafts. The shaft and clamp do not allow sharp vibrations up and down.
7. Reins. Used to control the horse. The ends of the reins are fastened to the bit rings.
8. Arc. Using tugs, it fastens the clamp with the shafts of the cart and plays the role of a shock absorber, softening shocks from uneven roads and jerks when the cart starts moving.
The bow has a ring for pulling the reins and two cutouts at the ends where the shafts fit.
Harness order
1
. The harness begins with cleaning and examining the horse, inspecting the integrity of the harness and cart.
We check whether the tugs are the same length. If necessary, we trim, otherwise the harness will be uneven and skewed in motion.
2
. We roll the cart out onto a free, flat area, take out the reins, bow, and harness.
3
. The midriff and belly are two separate straps, one end sewn to one ring. We pass both belts through the ring so that a loop is formed. We put this loop on the left shaft (hereinafter all directions relative to the horse).


4
. We put a bridle, saddle, and collar on the horse. Make it more convenient in the stall.
We place the saddle approximately on the lower half of the withers. If you place the saddle completely on the withers, it will be too high, if behind the withers on the back, it will be too low.
First we turn the clamp over with the pliers up, put it on the head, in the upper (narrowest) part of the neck we turn the clamp towards the mane back with the pliers down, lower it onto the shoulders, straighten the mane from under the clamp.

5
. We place the harness on the withers and straighten it towards the croup, fasten the buckles of the harness to the straps on the collar. If there is only the top collar on the clamp, then fasten the side belt buckles to the base of the tug.
We adjust the size of the harness so that the palm of your hand fits between the headband and the ischial tuberosities.
6
. We take the horse out into the yard and lead it into the shafts.
There are three ways to get a horse into the shafts:
- Drive through the shafts. Suitable for horses that can stride well over the poles.
- Place it in front of the cart and put it in the shafts. Suitable for compliant horses.
- Roll the shafts ONTO the horse. Most often used for young or shy horses.
7
. We take an arc and stand in front of the shafts, facing the horse. We attach the arc to the right leg. We take the tug with our left hand.
During operation, rawhide tugs stretch, so usually the tug is twisted 1-2-3 times, depending on its length, adjusting it to a specific harness. If the farm uses one horse in the same shafts, and the tugs are made of rope, then there is no need to twist them, it is enough to adjust the length of the tugs and periodically align them.
We place the shaft on the tug so that the tug lies at a distance of approximately 1-2 palms from the end of the shaft. We take an arc in front of us, with the ring away from us. We insert the left end of the arc into the tug loop. We shift the end of the arc through the shaft in front of the tug. At the same time, we unfold the arc with the ring forward, so that the shaft fits into the cutout of the arc. We place the arch on the horse's neck.


8
. Let's move on to the second shaft. We apply the arc with the notch to the shaft at an equal distance with the first tug. We take the second tug and, if necessary, twist it exactly as many times as the first one was twisted. We place it on the shaft behind the arc.
We pull the tug: with our left shoulder we rest against the shaft, with the same hand we take the pliers and pull it towards ourselves with force. With your right hand we put the loop on the arch.


9. Tighten the clamp. Standing to the left of the horse, wrap the soup around the pliers once. Resting your foot on the pliers, we tighten the soup with all our might. Wrap and tighten the soup again. Be sure to tighten the belt with great effort! If the tie tightens easily, then it is necessary to remove the arc and twist the tugs more strongly.

10. We tie the soup. We hold the strap with the thumb of our right hand, press on the right plier with our left hand, and thread the tip of the supony down into the resulting gap. Tighten the supon until it stops. We thread the tip up.


We pass the second loop into the formed loop. We tighten it.
Do not try to pull on the loop itself; just pull up the first loop and then tighten the second.


After this, we wrap the loop with the end of the soup. Fold the tip in half and thread it through the end of the loop. The soup is tied.


After tightening the pliers and tying the suponi, the arc should stand perpendicular to the shafts and not be subject to oscillation back and forth when pressing on it with your hand.
11.
Let's move on to the left shaft. The distance from the tugs to the saddle loop should be approximately 40 cm, i.e. the distance of a bent arm, from the elbow to the fingertips.
We straighten the saddle string and thread it through the saddle bow. We straighten the underbelly and thread it through the belt loop of the girth.


12.
We put the horse in the collar: move the horse one step forward or, if it is more convenient, move the cart back so that the collar fits tightly on the shoulders.
13.
Let's go to the other side. We take the underbelly, pull it up and throw it over the shaft so that the horse does not step on it. We pull up the saddle and wrap it around the shaft, away from us. The distance from the saddle to the tugs on both shafts should be the same.
We tighten the saddle: with our left hand we pull the belt through the saddle, raising the left shaft, with our right hand we pull it by the end of the belt, raising the right shaft. This way we raise the clamp.
We raise the shafts so that approximately 3-4 fingers pass between the collar and the horse’s neck (comb and throat). This way the horse can raise and lower his neck as needed.


14.
There are many ways to tie a necklace, the principle is the same for all. I will describe two ways.
First way: After the clamp has been lifted, we throw the tip of the saddle from right to left over the belt and under the shafts towards ourselves. We wrap it around the shaft from bottom to top in front of the belt.


We pass the tip under the belt from right to left, throw it on top, make a loop and thread it through the hole formed. We tighten it.


Second way: After lifting the clamp, we wrap the saddle around the shaft, first in front of the belt, then behind it, i.e. eight. Then we throw the tip over the belt from right to left, make a loop and pass it through the resulting hole. We tighten it.


In any case, the final loop lies in front of the intermediary.
It is necessary to ensure that the shafts are raised evenly, otherwise the harness will skew when moving!
15. We place the abdominal strap on top of the saddle loop. Pull the belt down with force and place it across the abdomen for additional fixation. We wrap the underbelly around the shaft.


Fold the tip of the underbelly and pass it through the loop of the underbelly. Tighten the loop with force.


The saddle, tied at the back, keeps the underbelly from sliding down the shaft during movement.
16.
We check the girth and, if necessary, tighten it.
17.
Let's move on to the horse's head. We cross the reins so that it does not dangle and place it around the neck. We pass the lanyard through the ring of the arch and tie it to one of the tugs to such a length that the horse can freely stretch his neck, but cannot bend too low. If the rein is short, just wrap the lanyard around the bow and tie it on the ring.
18.
We adjust the harness: we throw long straps with tassels over the shafts so that they do not get tangled in the horse’s legs. If there are loops with fasteners, we fasten them to the shafts.
19.
We fasten the reins to the bit rings. If there are rings on the tugs, we pass the reins through them. If there are no rings, you need to pass one rein under the tug, the second above the tug.
In case the horse bolts, this will give additional control.
Remember, proper fitting of equipment and harness will minimize the possibility of injuring your horse!
Unharness in reverse order:
- unfasten the reins,
- we untie the occasion,
- we untie the interlace (to do this, simply pull the tip of the abdomen and unwind the straps), pull them out on the other side,
- dissolve the soup,
- remove the tugs and arc,
- we tie the soup to the tug so that it does not tear,

- remove the clamp. The harness can not be unfastened, but gathered around the neck, tied with a cord to the collar and removed together with it. Next time the harness can be worn together with the collar,
- We remove the saddle, hang it on the collar, and throw the girth over.
- We take the horse into the stall and remove the bridle.
- We return to the cart. Remove the belts from the shaft.
- We wind up the saddle and reins:
We take the reins with one hand by the buckles (the saddle with the belly by the ends). We wrap the other hand around the elbow, placing it in the palm. We wrap the tip a couple of times around the wound reins and thread it through the top hole. Lightly tighten. We hang it by the resulting loop (saddle ring).
- We take all the ammunition to the harness room and put the cart in place.
At first glance, everything seems so complicated, but after a few independent harnesses you will no longer get confused in the names, belts and knots.
Good luck!
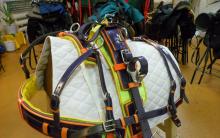
European shaft-and-line harness

Clamp shaft-and-string harness

Sequence of line-drawbar harness
Line-drawbar harness - pair. It is used when working on horses in agricultural carts and implements with a drawbar. Before harnessing the horses, it is necessary to align the lines, bibs and stripes. After bridles and collars are put on the horses, they are placed on the right and left sides of the drawbar, depending on their position in the harness. Then a neck guard is put on the end of the drawbar or the front roller and secured in the bib ring. The strappers fix the position of the clamp and the tension of the lines. The bibs are secured to the collar and to the lines. The latter are secured to the windrow in the following sequence: first the inner and then the outer line. After this, the reins are fastened. The clamp with a line-drawbar harness should be slightly shorter than with a shaft-arc harness.
Line-by-line harness (without drawbar and shaft)
This type of harness is used in harnesses, in agricultural implements (plow, harrow), and in forest skidding. When performing this work, it is recommended to use a saddle and a saddle strap.


Averina Dina and Arina: biography, parents, sporting achievements
Felix Savon - Cuban amateur boxer
Formulas for determining their mass
Airborne hand-to-hand combat Russian training videos on hand-to-hand combat for the Airborne Forces
In what year did volleyball appear?